In order to improve the user experience when working with Stable Diffusion for AI based image generation, there are various approaches that differ in their user interface concept. So far, two approaches have prevailed: AUTOMATIC1111 webUI and Invoke-AI. Both facilitate text-based image generation (txt2image) in different ways. In the following we present AUTOMATIC1111 in more detail.
If you're looking for a convenient and user-friendly way to interact with Stable Diffusion, the webUI from AUTOMATIC1111 is the way to go. This open-source project makes it easy to use image generation models and offers many other features in addition to the normal image generation. In this article, we'll give you a quick tour of how to install and use the webUI on our AIME MLC.
One of the benefits of using the AUTOMATIC1111 webUI (from now on just named webUI) over the command line such as described in our blog article is that it's easy to set up and use, especially for beginners. The intuitive web interface makes it simple to access all sorts of features, new ones being added regularly. Plus, it's more efficient than using the command line. So why not give it a try and see how it can enhance our experience with Stable Diffusion on an AIME workstations or server?
To get started with the webUI, we just need to create an AIME MLC container and follow the installation instructions.
The webUI user interface offers many areas separated by tabs with different options for creating and manipulating images. In the following the features in each tab of the webUI are shortly explained. Throughout the examples, the different versions of Stable Diffusion are compared. Finally, several tips and tricks are given to get the most out of it.
Installation
To get started with the webUI, the first step is to create a working directory named "stable-diffusion-webui", clone the Github repository and create an AIME ML Container. Update MLC if the Pytorch 1.13.1 container isn't available on your system.
mkdir stable-diffusion-webui
cd stable-diffusion-webui/

git clone https://github.com/AUTOMATIC1111/stable-diffusion-webui.git

mlc-update-sys
mlc-create webui-automatic1111 Pytorch 1.13.1 -w=./stable-diffusion-webui/
mlc-open webui-automatic1111Before starting with the configuration, you'll need to make a few edits and update/install some packages and dependencies:
[webui-automatic1111] user@hostname:/workspace$
sudo apt update && sudo apt-get install libgl1 wget unzip libglib2.0-0 python3.8-venv nano
pip install fastapiBecause AIME MLC is already a set up virtual environment, there is usualy no need to create a new one, like venv or conda. Since this is not taken into account in the auto-installation script, we have to adjust this accordingly. For that the webui-user.sh file needs to be edited by uncommenting the line that specifies the environment. Changing "venv" to "-" will prevent a new environment from being created inside a folder named "venv" but will also create a folder named "-" which we will ignore.
> sudo nano webui-user.sh

line 22: 	venv_dir = "venv"
-> change to: 	venv_dir = -
We now need to download and install the model files (weights):
[webui-automatic1111] user@hostname:/workspace$
cd models/Stable-diffusion/

wget --no-parent -nd --accept *.zip -r http://download.aime.info/public/models
unzip -j -o "*.zip"
rm *.zip
cd -
This installs the 1.5 and 2.1 model files into the models/Stable-Diffusion/ directory. These models are subject to the CreativeML OpenRAIL M license.
The webUI allows you to switch between different models easily simply by clicking the grey-blue refresh button next to the checkpoint selector.

The rest of the installing is done by the webui.sh-script. Although not used, for the sake of simplicity we need to install the venv environment as the install script insists that it is present and we don't want to edit the installer so that we can later install updates of the webui without having to edit the script again each time.
As webUI is under heavy development and there can be extensive changes on a daily basis, we refer this description to the Git commit #22bcc7be428c94e9408f589966c2040187245d81 (from March 30th, 2023). We therefore recommend changing the branch when you run into problems starting the webUI server the first time using the current development state:
git checkout ea9bd9fc7409109adcd61b897abc2c8881161256Running AUTOMATIC1111 webUI
The final step is to launch the webUI, which starts an installation routine and checks for dependencies before starting the webUI server. It is recommended to use the xformers library, which is a powerful tool to speed up image generation and decrease the GPU memory requirements. Add the argument --xformers to use this.
bash webui.sh --xformersYou can now generate images by inserting a prompt, make use of negative prompts, edit the parameters (like described in our Stable Diffusion blog article) and click the "Generate" button:
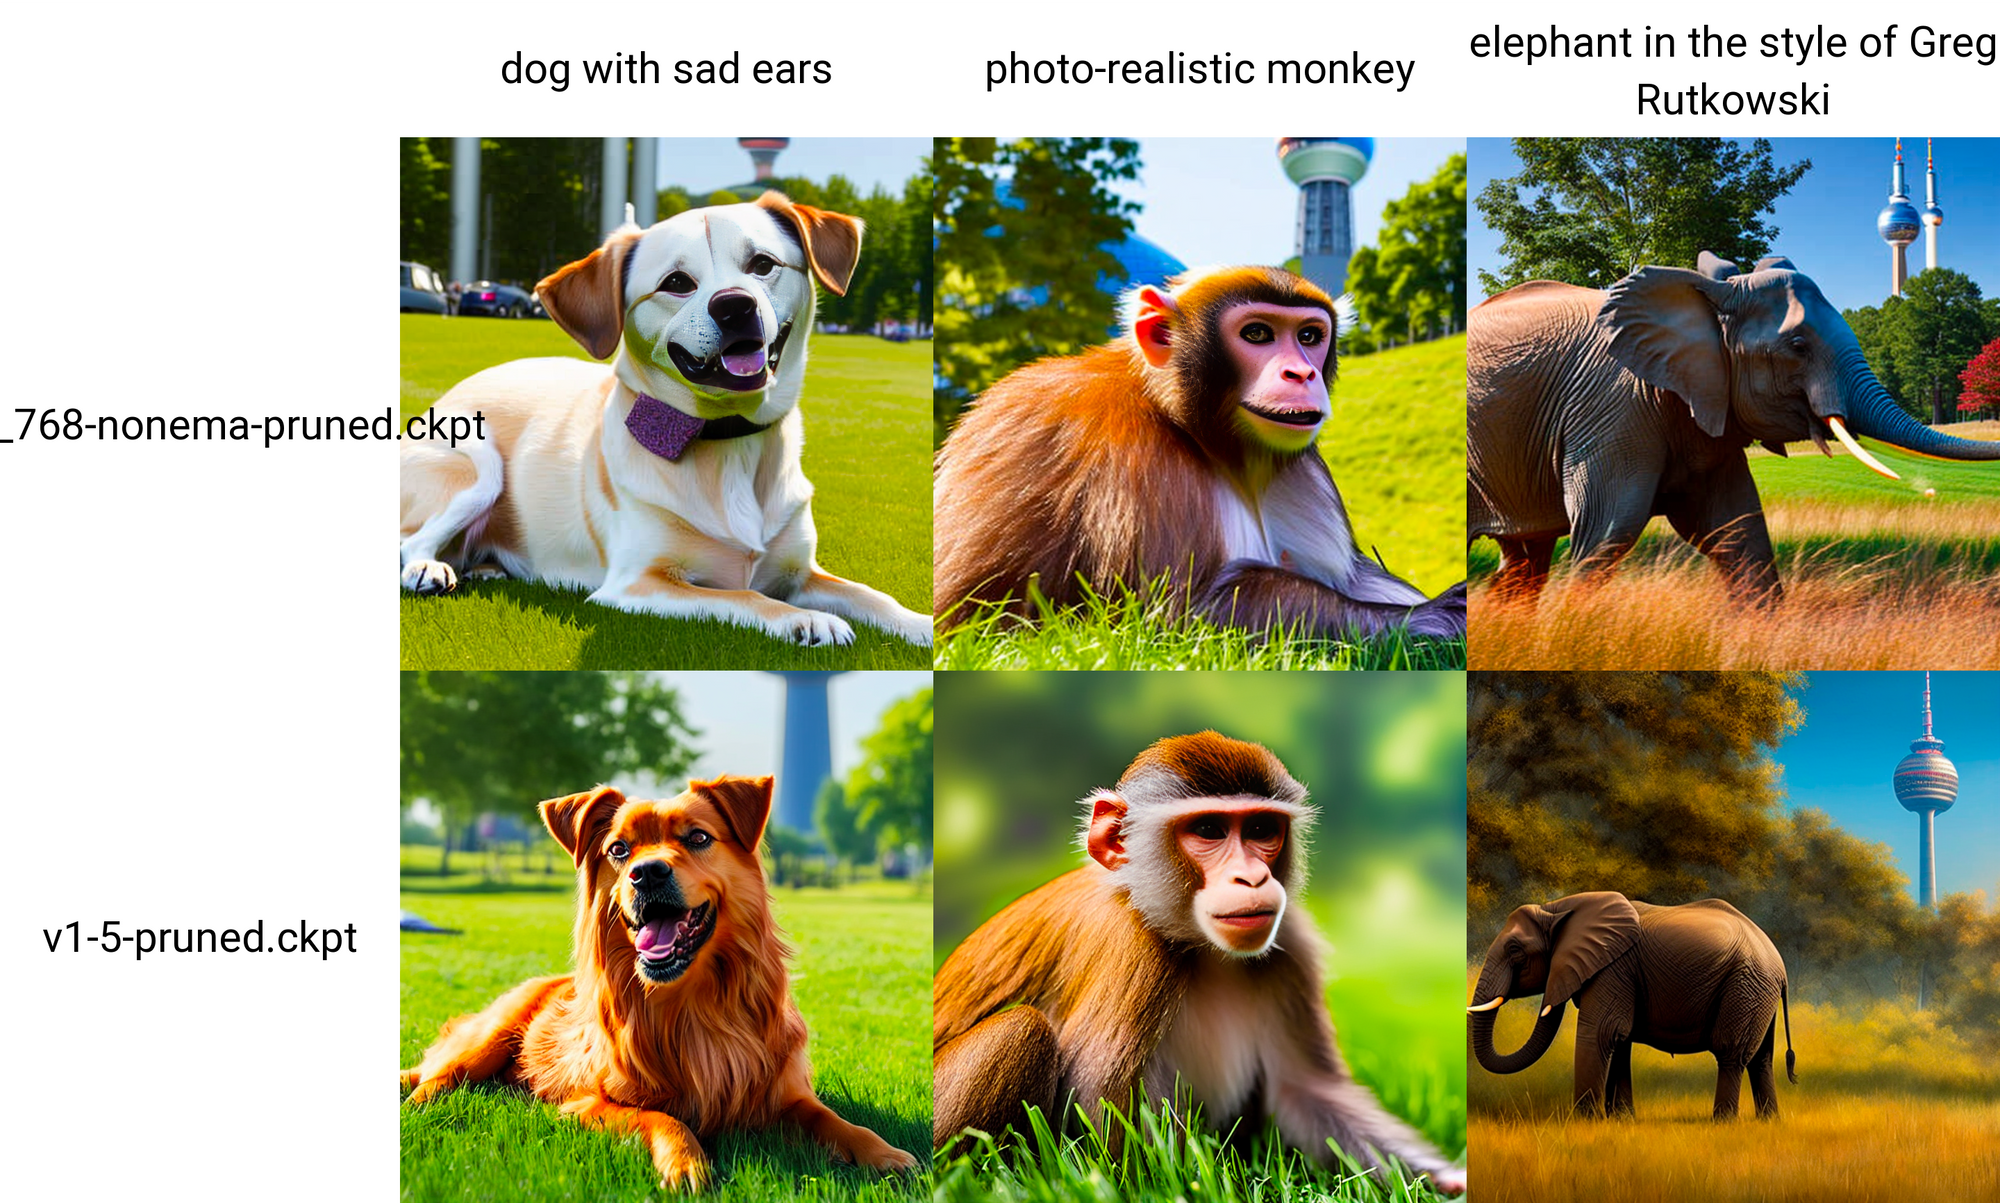
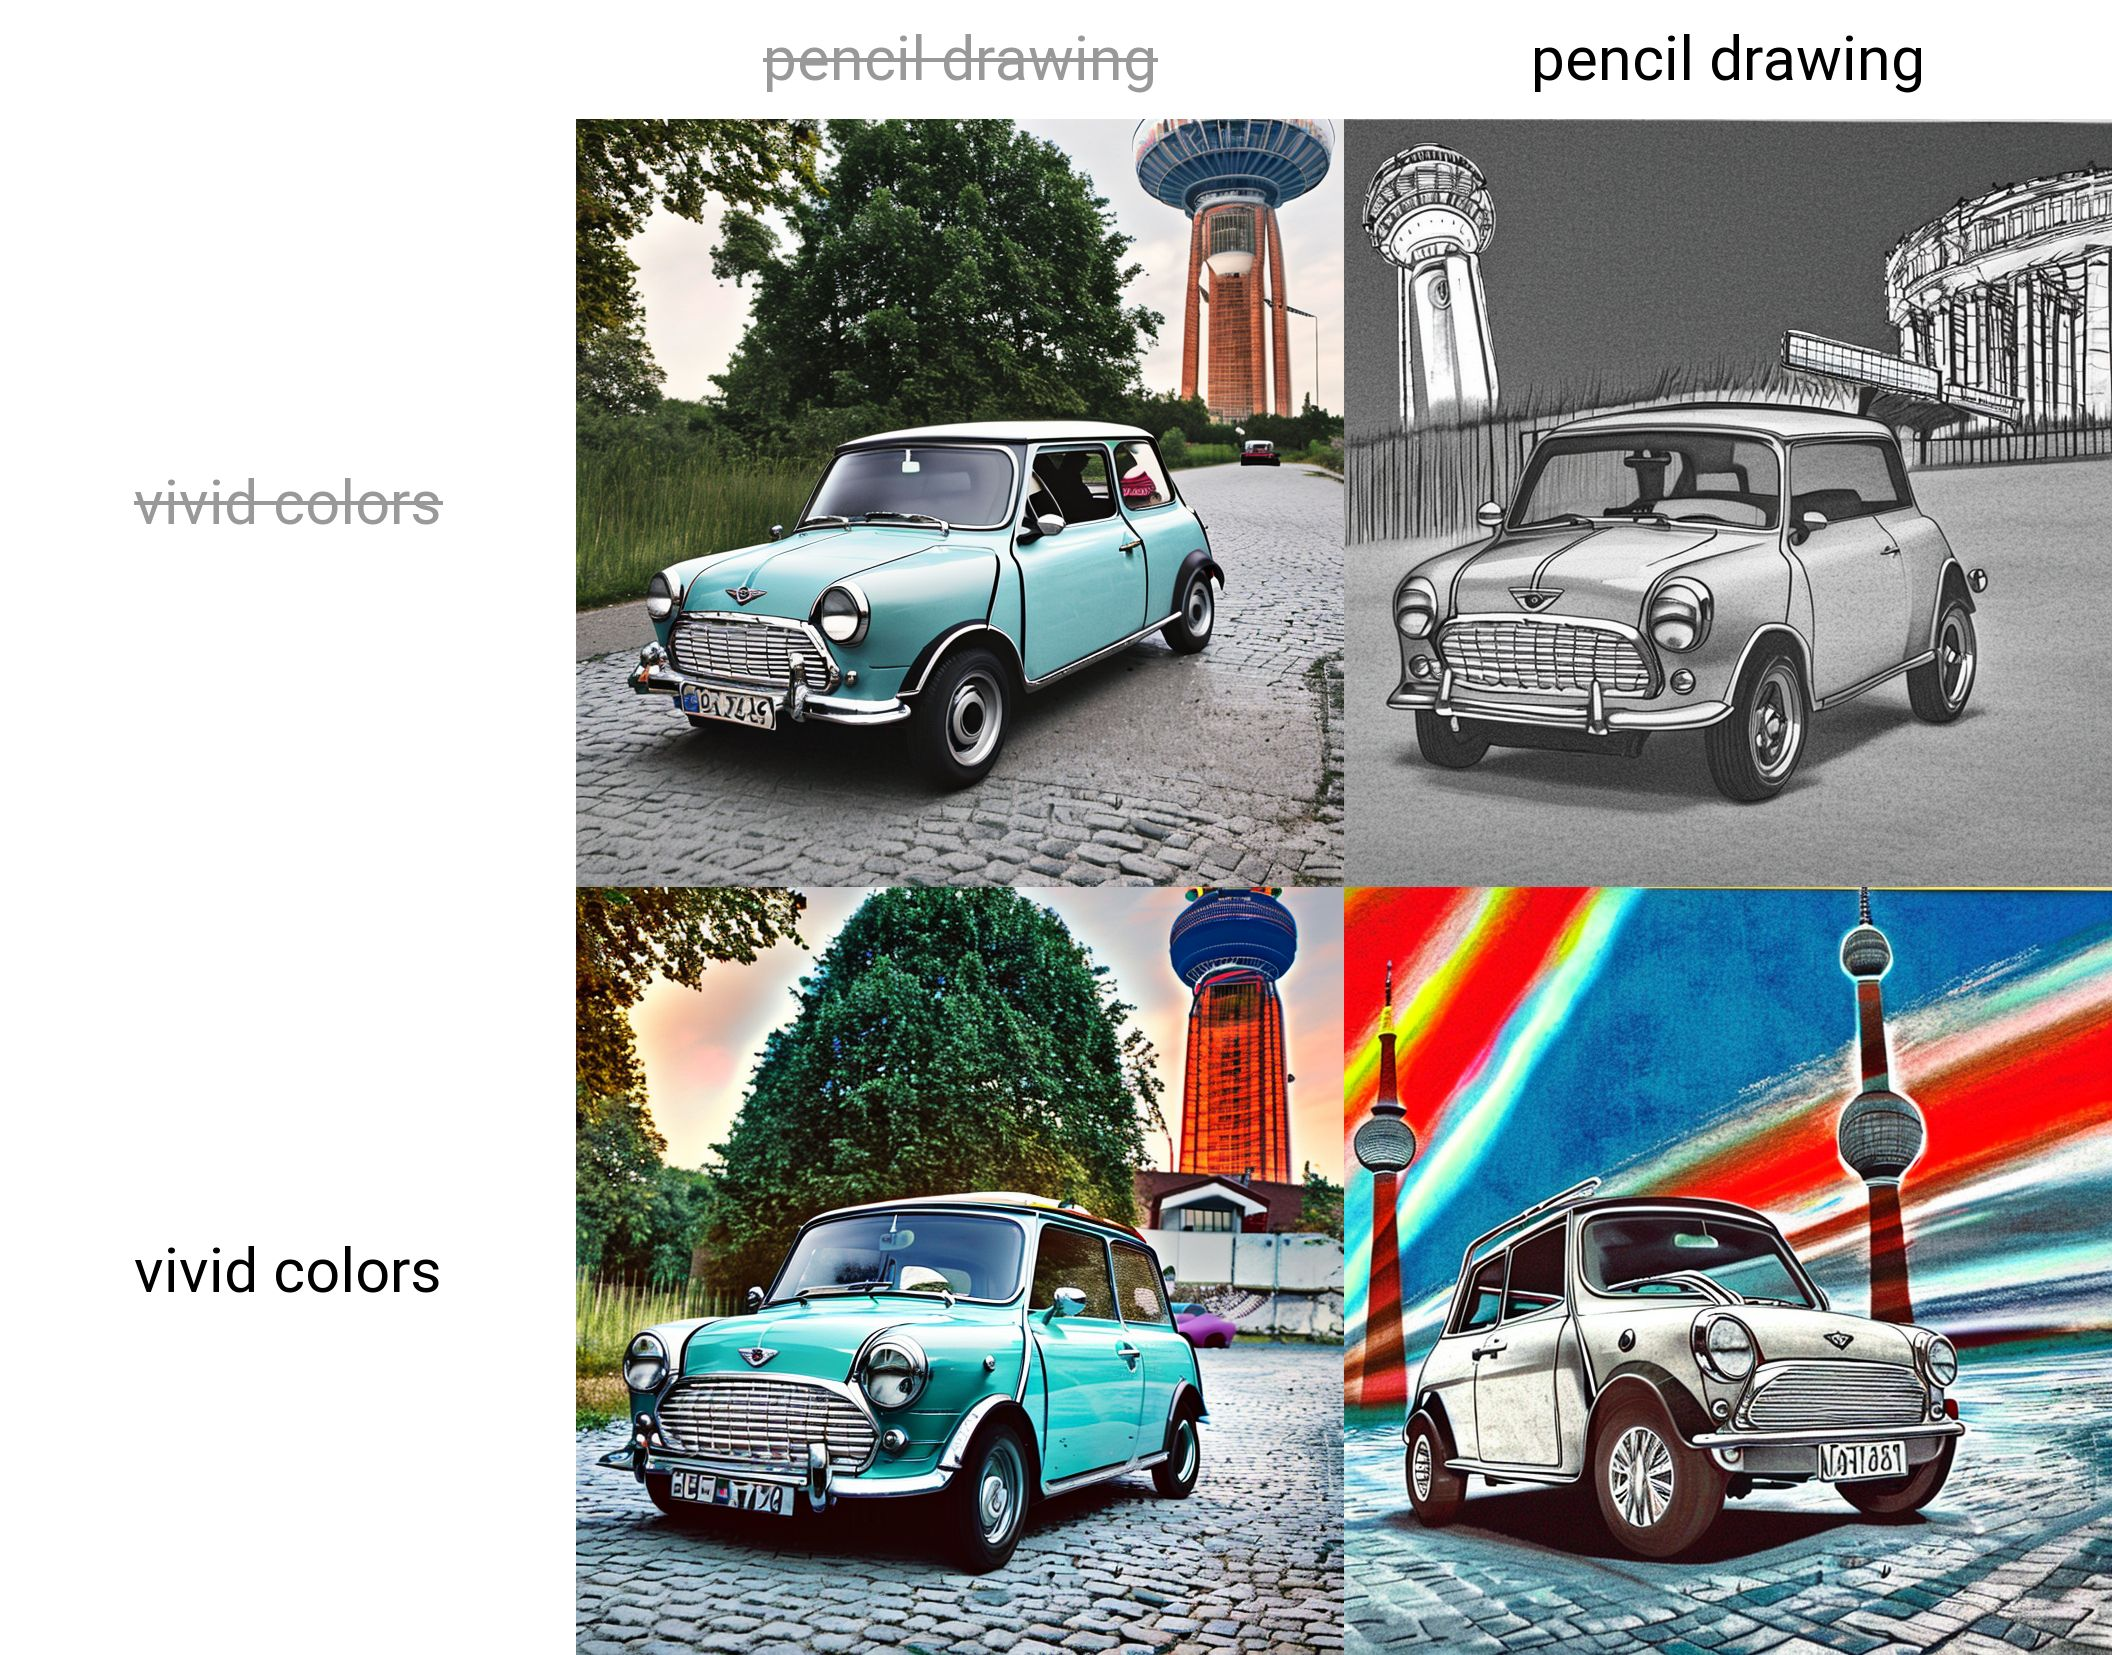
Stable Diffusion V1 vs. V2
The architecture of Stable Diffusion V2 differs a little from the previous Stable Diffusion V1 version.
The most important shift that Stable Diffusion 2 makes, is replacing the text encoder. Stable Diffusion 1 used OpenAI's CLIP to get a description of images while training. The dataset on which CLIP was trained is closed source. Stable Diffusion 2 now uses OpenCLIP, which is open source and trained on a publicly known dataset, which is a filtered subset of LAION-5B.
People claim that the new version generates images of worse quality because the same LAION-5B dataset was used, from where certain images were filtered out. As a result, many popular artist names cannot be used to transfer their style into newly generated images. However, the V2 model has a better sense of location and can handle longer, more complex prompts. It also reacts better to a higher CFG scale, adding more detail to the generated images while the V1 model produced more "roasted" images. A reason for this is the newly trained OpenCLIP encoder, which encodes the prompt text into embeddings.
When comparing V1.5 and V2.1, we can see that V2 does a better job of capturing the surroundings and fitting the description. It is particularly good at generating landscapes, architecture, design, and wildlife images. It has also improved its ability to generate images of human anatomy, including limbs and hands. However, V2.0 struggled with art styles and celebrities due to the filters applied to the dataset, but V2.1 is finetuned on the V2.0 model with a lower filter and performs better in this regard - but still not as good as V1.5.
In addition to the base model, V2 also includes several specialized models:
- 512x512 txt2img
This model is trained to generate 512x512 images, just like the previous models. It has both a base model and an ema model. - 768x768 txt2img
This model is trained for generating 768x768 images. - depth2img
This is a separate img2img model that improves upon the previous version by creating a depth mask. This adds a sense of depth to the generated images. - Superresolution upscaler x4
This model is trained to improve the resolution of generated images by upscaling them. - Inpainting
This is an improved inpainting model.
Throughout this article, the models V2.1 768x768 and V1. 5 512x512 are compared while describing the different features of the webUI. Stay tuned for more blog articles covering the various applications of Stable Diffusion V2.
AUTOMATIC1111 WebUI
The next sections will shortly cover the key features of each tab of the webUI. The Github repo is regularly updated with new features. There is also wonderful support if you have any problems or questions.
The feature wiki is an excellent and comprehensive presentation of all the features, along with explanations and examples. It explains the usage of the interface and interesting features like
- Textual Inversion
- Lora
- Hypernetworks
- Depth Guided Model
- Inpainting/Outpainting
- Masking
- Prompt matrix
- Upscaling/Resizing
- Infinite prompt length/BREAK keyword
- Attention/emphasis
- Loopback
- X/Y/Z plot
- Styles
- negative prompts
- CLIP interrogator
- Face restoration
and a lot more.
Credits to the creator AUTOMATIC1111 and contributors for keeping the Github repo up-to-date and making this possible.
webUI Features
In the follwoing we describe some of the features and tabs from the webUI.

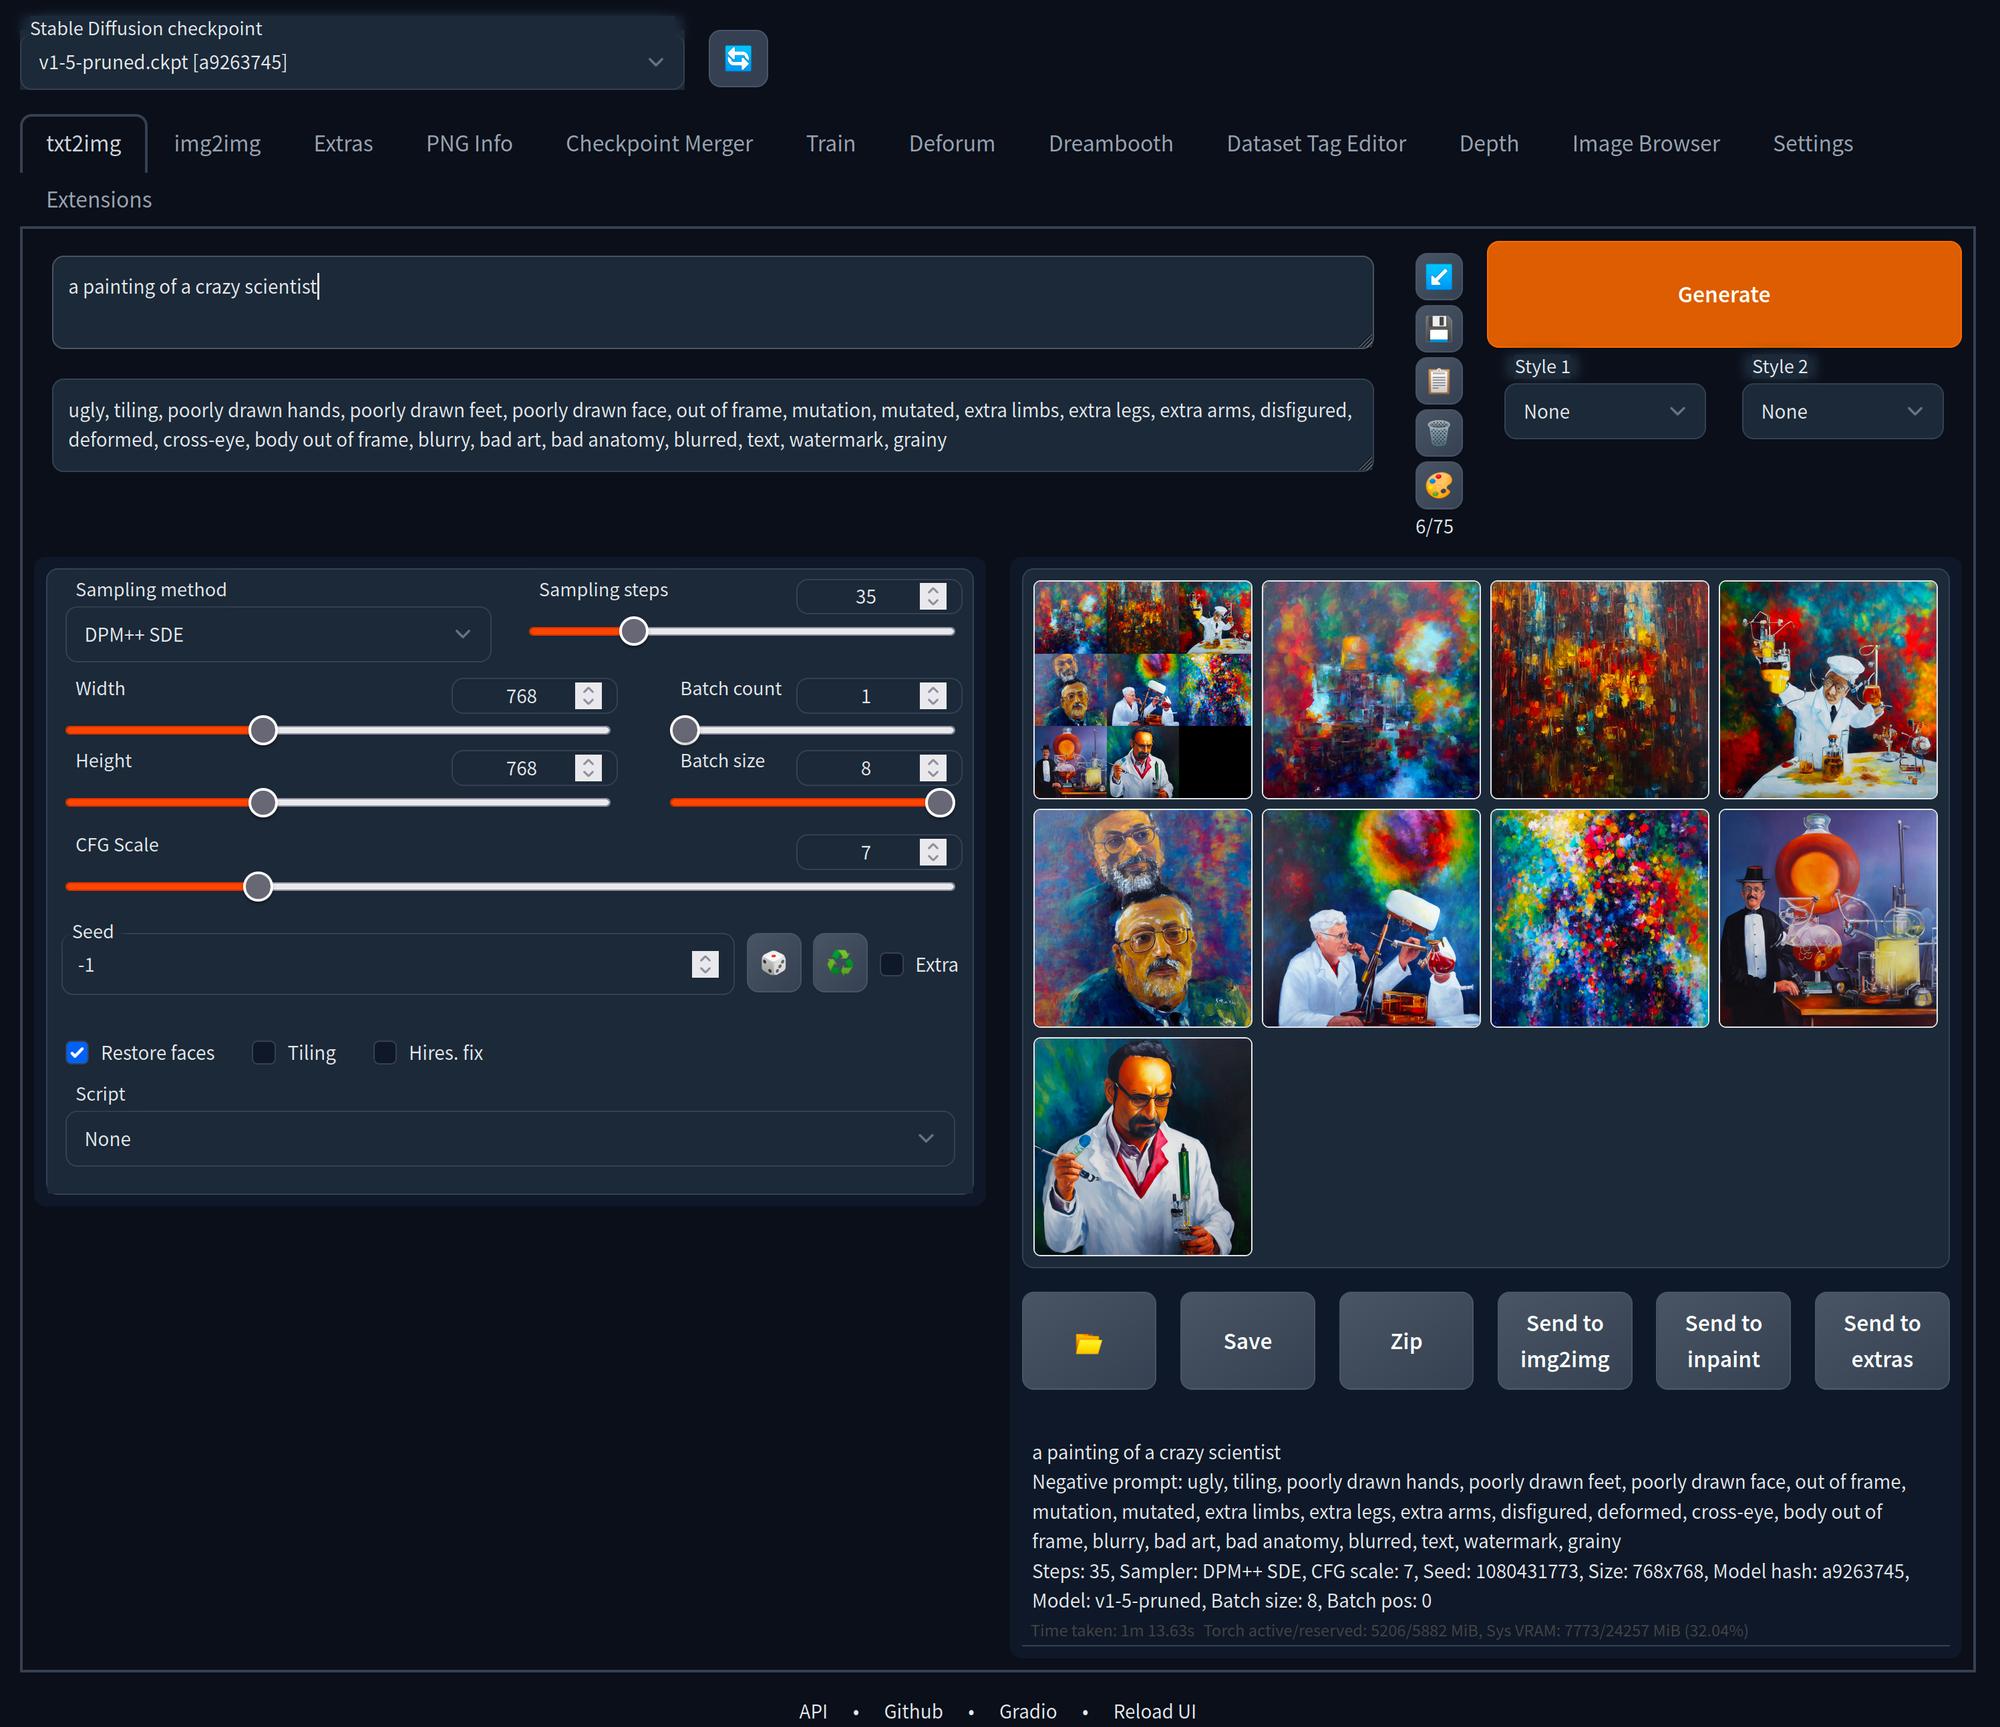
Txt2Img Tab
This is the classic text-to-image generation. Provide the inputs and parameters on the left side and generate the outputs on the right side. This has the same functionality as described in the previous blog article, but provides more options and is more convenient to use. For an in detail prompting guide, see the previous blog article about Stable Diffusion or the Stable Diffusion v1 prompt book.
Prompt Features
- Type the prompt and press the generate button. Press the interrupt button to stop the process. To keep the generations running indefinitely, right-click on Generate and select Generate forever. Remember to cancel it when you want to stop.
- Negative Prompt
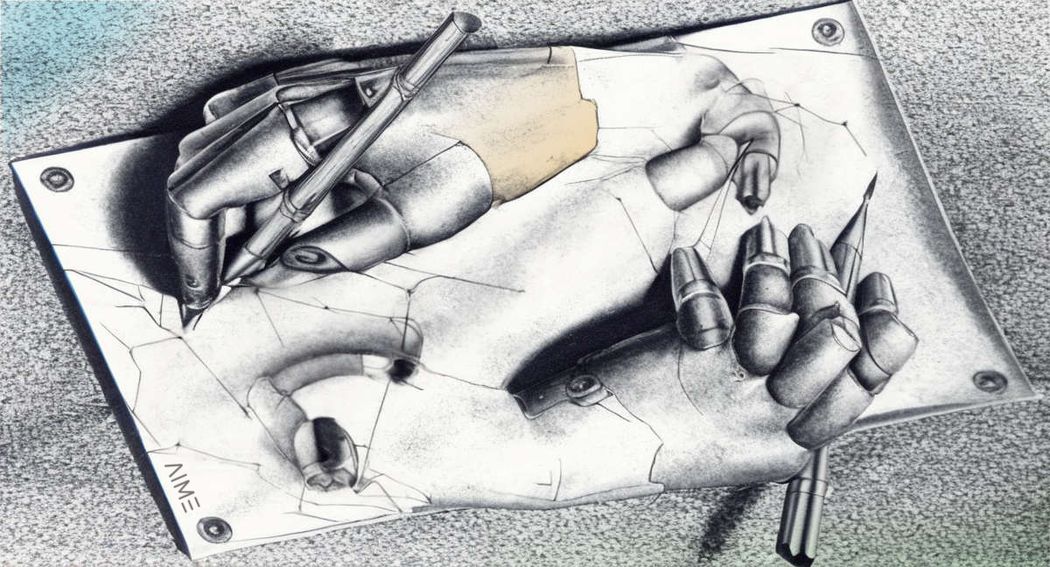
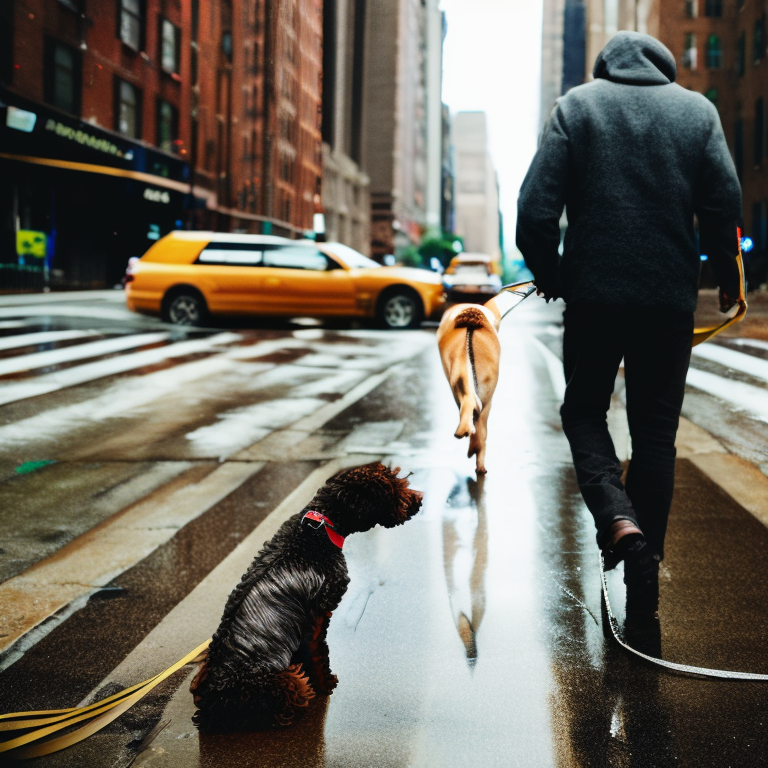
Here you describe what you don't want to see. This is particularly useful for fine-tuning once you have a suitable image. It is essential in the v2 models. For example, you can use the Negative Prompt feature to remove extra limbs or to avoid poorly drawn hands, feet, or faces.- A common negative prompt for humans is "ugly, tiling, poorly drawn hands, poorly drawn feet, poorly drawn face, out of frame, mutation, mutated, extra limbs, extra legs, extra arms, disfigured, deformed, cross-eye, body out of frame, blurry, bad art, bad anatomy, blurred, text, watermark, grainy." This prompt can be saved as a style and used whenever you want to fine-tune the model.
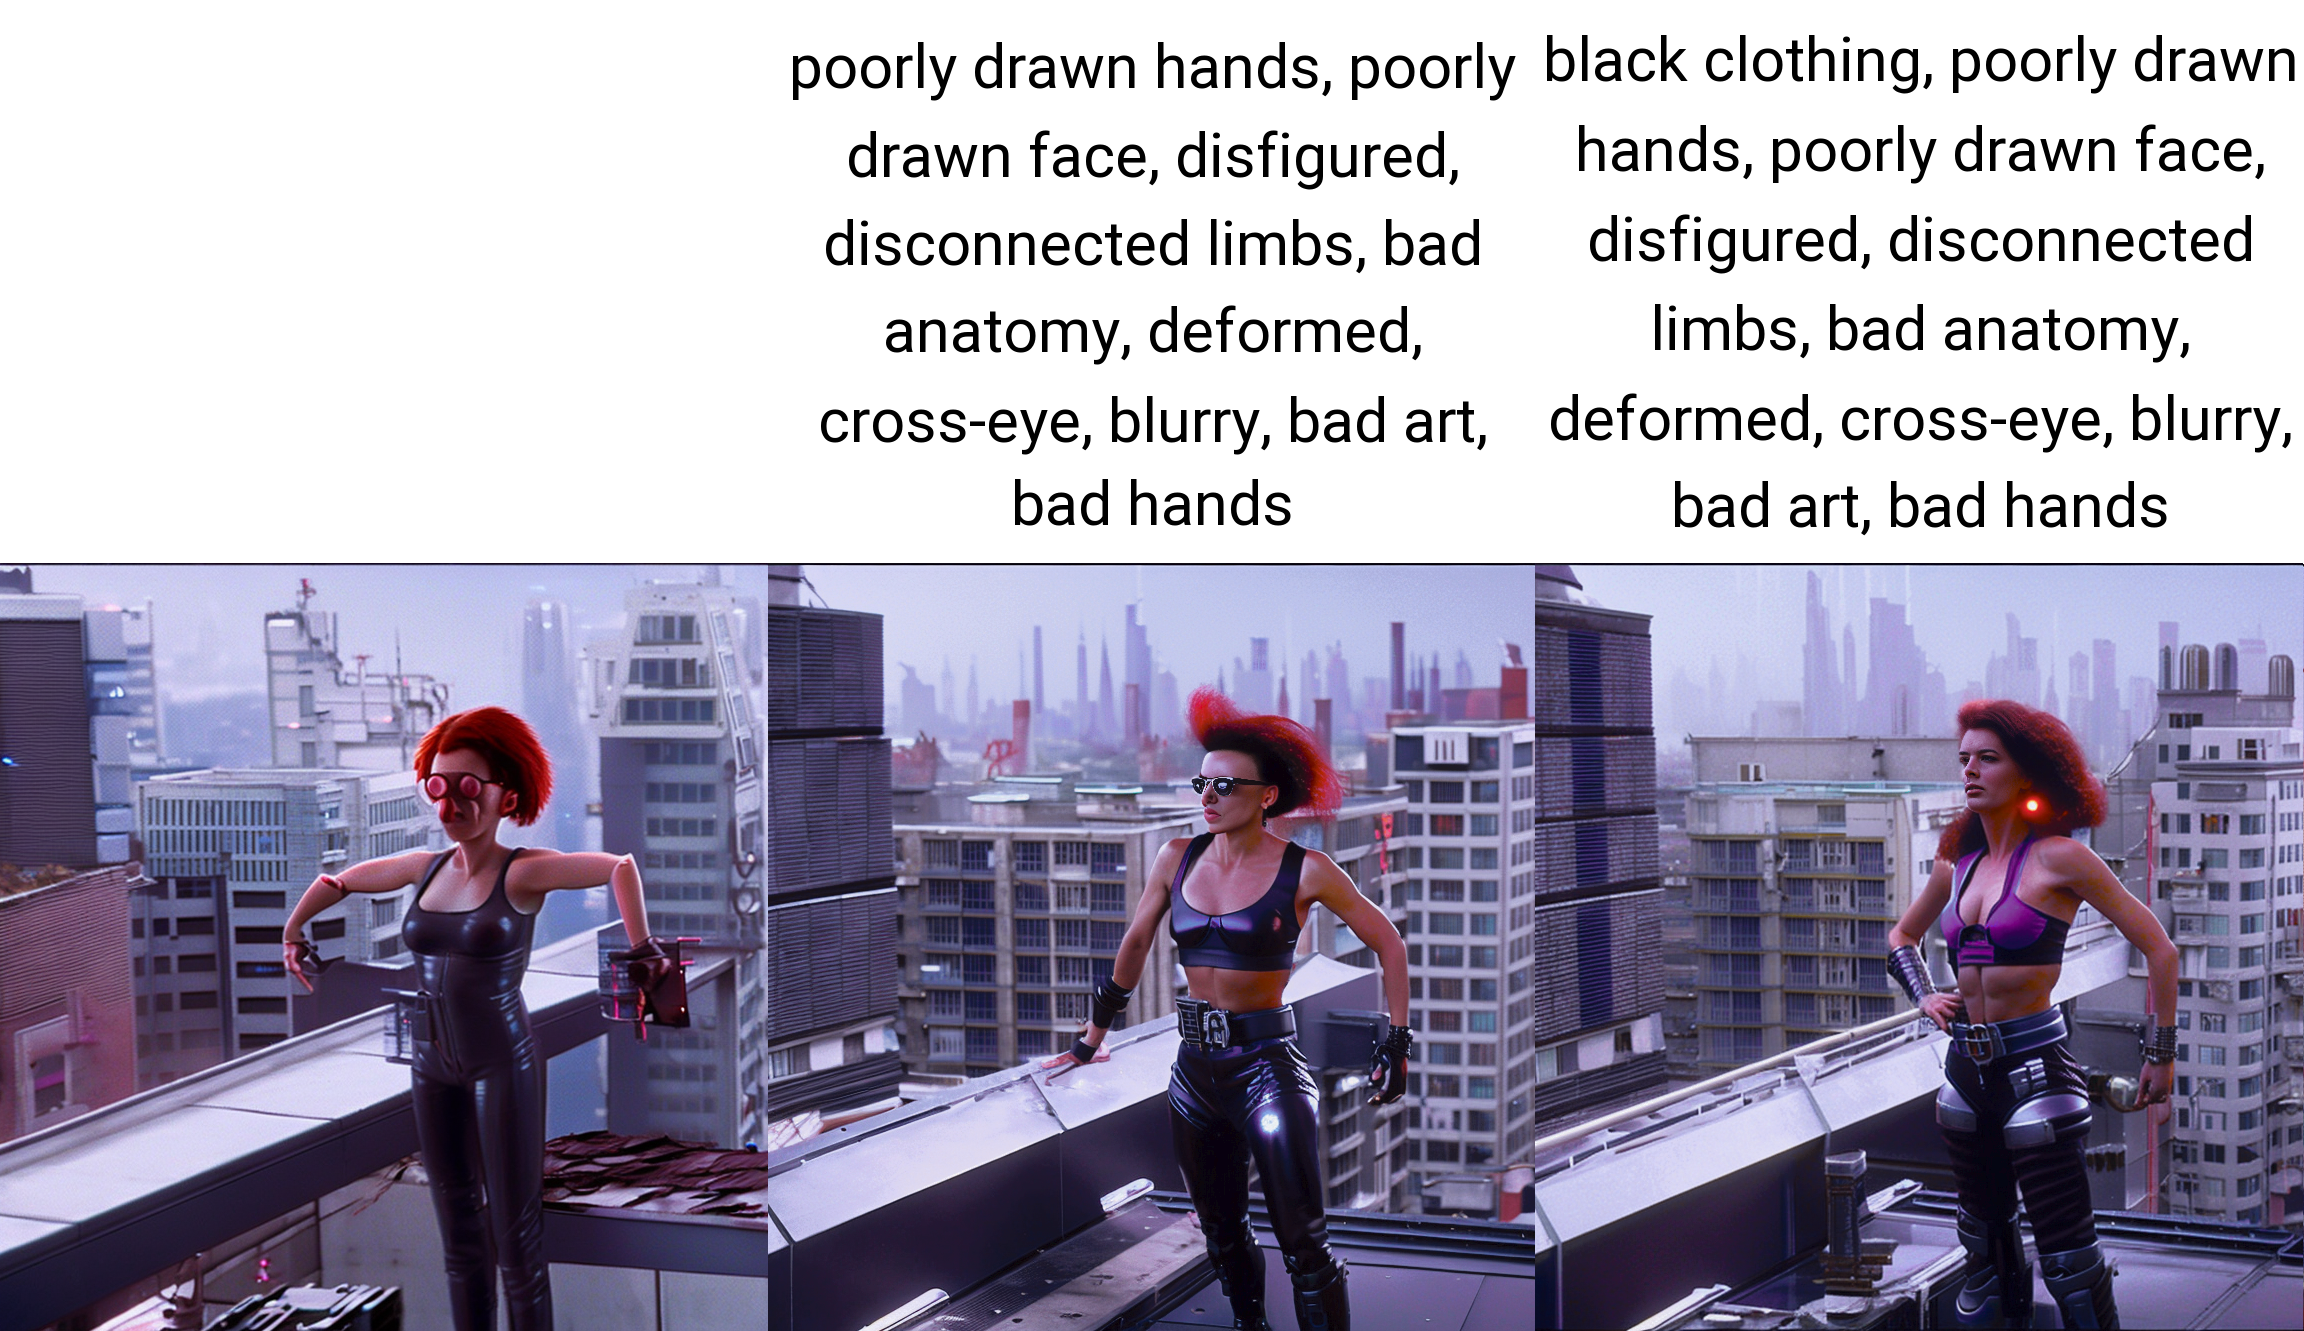
Negative prompt: "black clothing, poorly drawn hands, poorly drawn face, disfigured, disconnected limbs, bad anatomy, deformed, cross-eye, blurry, bad art, bad hands"
Steps: 20
Sampler: DPM++ SDE
CFG scale: 9.5
Seed: 3574490288
Size: 768x768
Model: v2-1_768-ema-pruned.ckpt
- Styles
This is another easy feature for improving the workflow. Save a prompt as a style for later use. An example is saving your favourite magic words to improve your image. Or you can save the negative prompt above as a style.

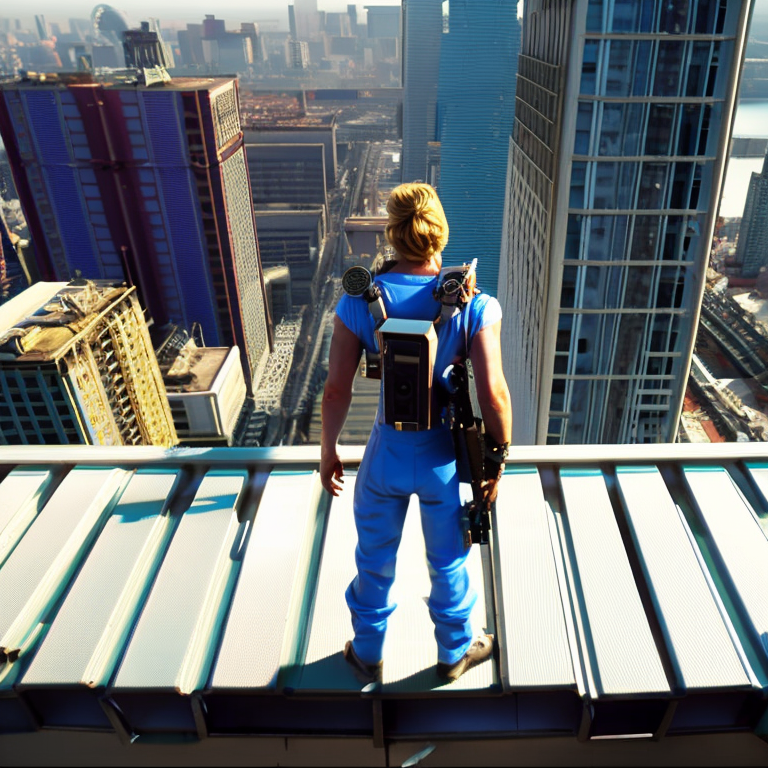
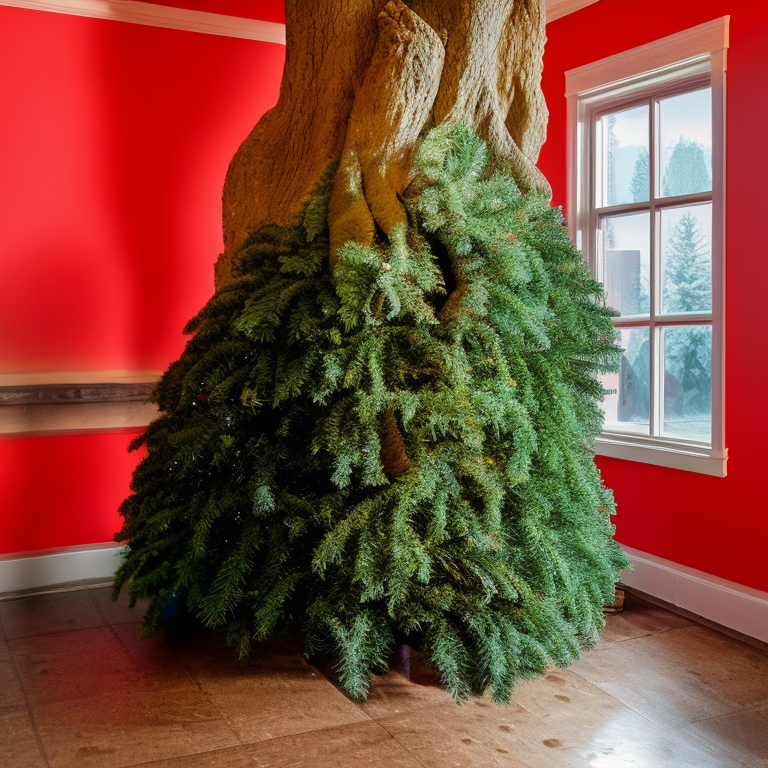
- Prompt Scheduling
Allows to switch the prompt while sampling, use[word1: word2 : x]to switch the prompt at steps or fractions 0 < x < 1 from word1 to word2. For example, a picture of a [Christmas: old oak: 0.5] tree. At half of the sampler steps, it will switch from sampling a picture of a Christmas tree to a picture of an old oak tree.

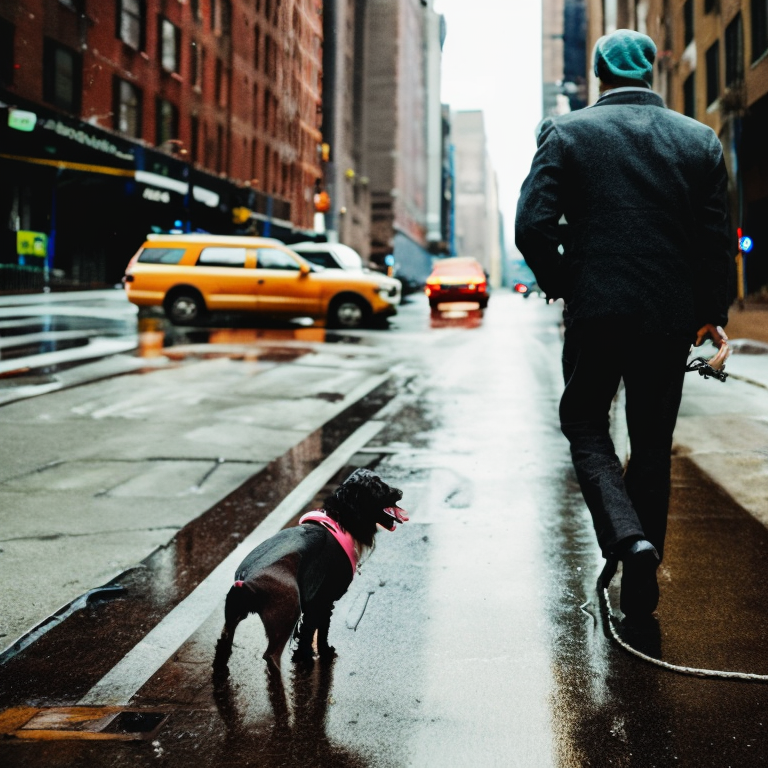
- Weight or Attention/Emphasis
You can adjust the weight of a word in a prompt by the syntax(word: factor)wherefactoris a float value greater than zero. A value less than 1 means less important while values larger than 1 means more important. For example, we can adjust the weight of the keyworddogin the following prompt: "man and (dog: 1.8) in the streets of new york, beautiful, atmosphere, vibe, rain, wet"
The same effect could be achieved using brackets like (word) to attenuate words and [word] to deattenuate words. You can use multiple instances to make the effect stronger. For example: "man and [[dog]] in the streets of new york". There are algebraic rules set so that(word)increases the strength of the keyword by a factor of 1.1 which has the same effect as(word:1.1).[word]decreases the strength by a factor of 0.9, like with(word:0.9). The effect is multiplicative like ((word)): 1.21, (((word))): 1.33 and [[word]]: 0.81, [[[word]]]: 0.73.
Another way to attenuate words is by placing them further in front.
Parameters and Options
These parameters are explained in our previous blog article.
- Sampler and Steps
There are different samplers to choose from, which are explained in our previous blog article. The more sampling steps, the longer it takes. A good way to get started is to use the DPM++ 2M sampler with 20 sampling steps. - Dimensions
Height and Width, best set it to the standard dimension of the model. - Batch Count and Size
Number of images to generate. - CFG scale: guidance scale
- Seed: leave it at -1 for random
- Tiling support
UI checkbox to create images that can be tiled like textures. These tile sizes can be adjusted as needed. - Restore faces
This uses Generative Facial Prior GAN (GFPGAN) to correct faces such as keeping the symmetry and restoring a collapsed face look. - Highres fix
Produce high-resolution pictures without usual distortions such as repetitivity. This is a two-step process, it creates images at a smaller resolution first and then upscales them to a higher resolution.
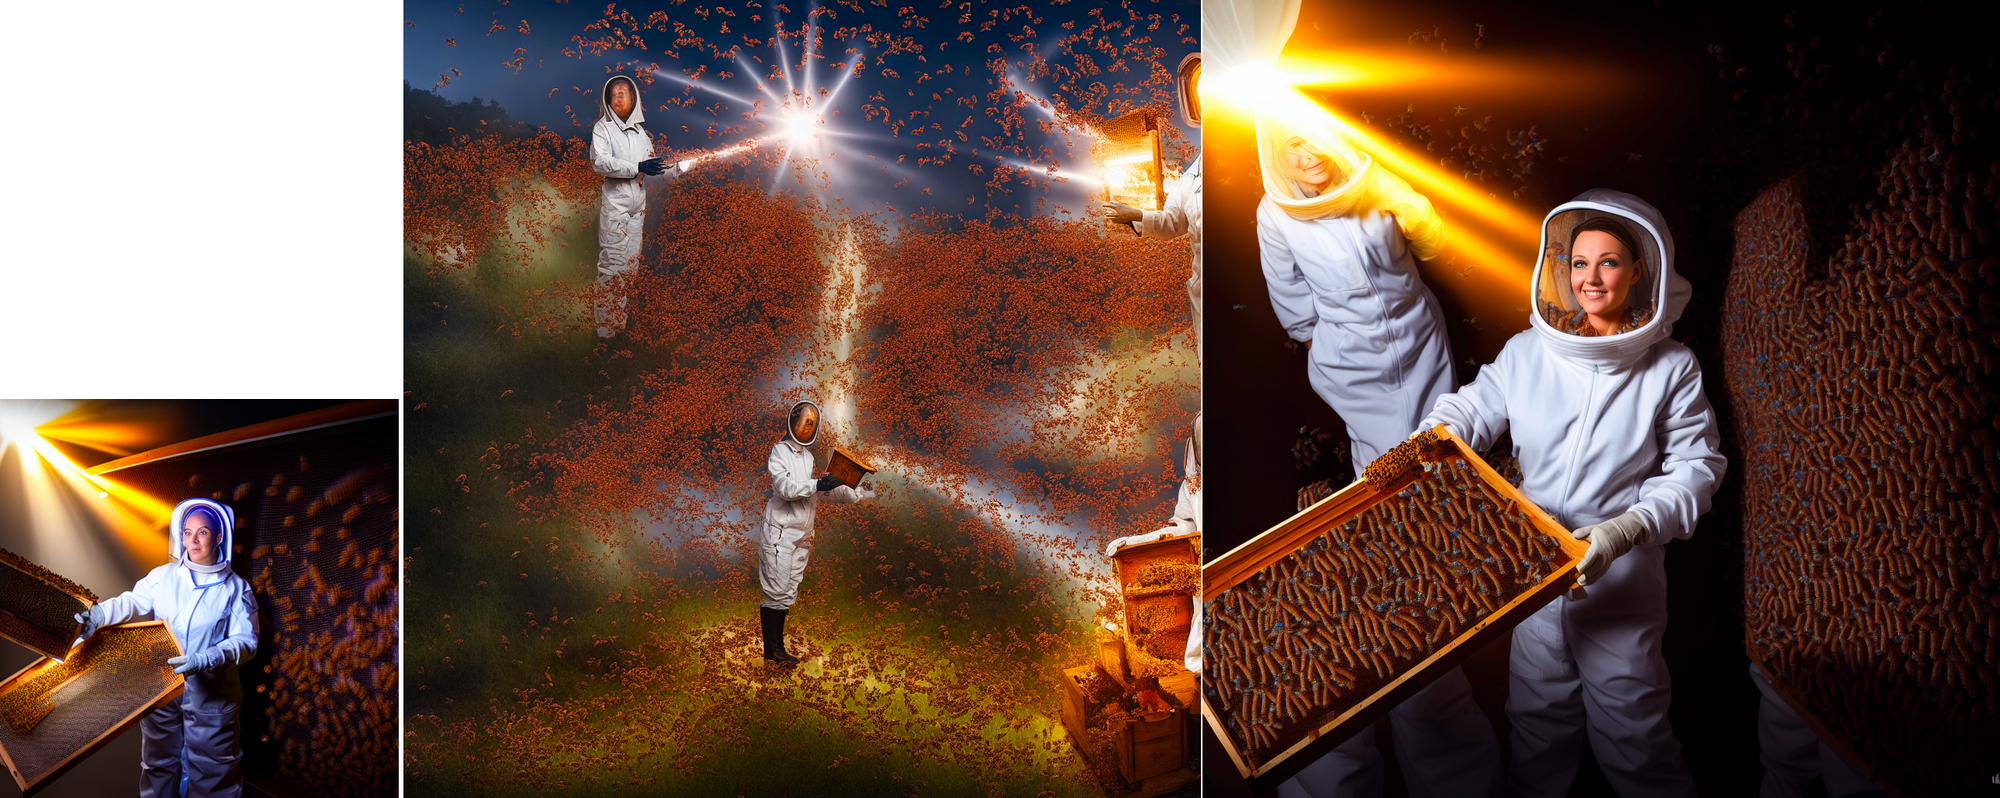
Negative prompt: "bee hat",
Steps: 20,
Sampler: DPM++ SDE,
CFG scale: 12.5,
Seed: 3239510979
Scripts
This is a key feature for choosing the webUI over the command prompt. It accelerates your workflow in experimentation phase for different prompts and seeds and in finetuning phase for different parameters:
- X/Y grid
Select the parameters such as different samplers or CFG scale. This creates a grid showing all combinations.
x0 - x1 [iter], ex 0.0 - 1.0 [10] or +(x_t)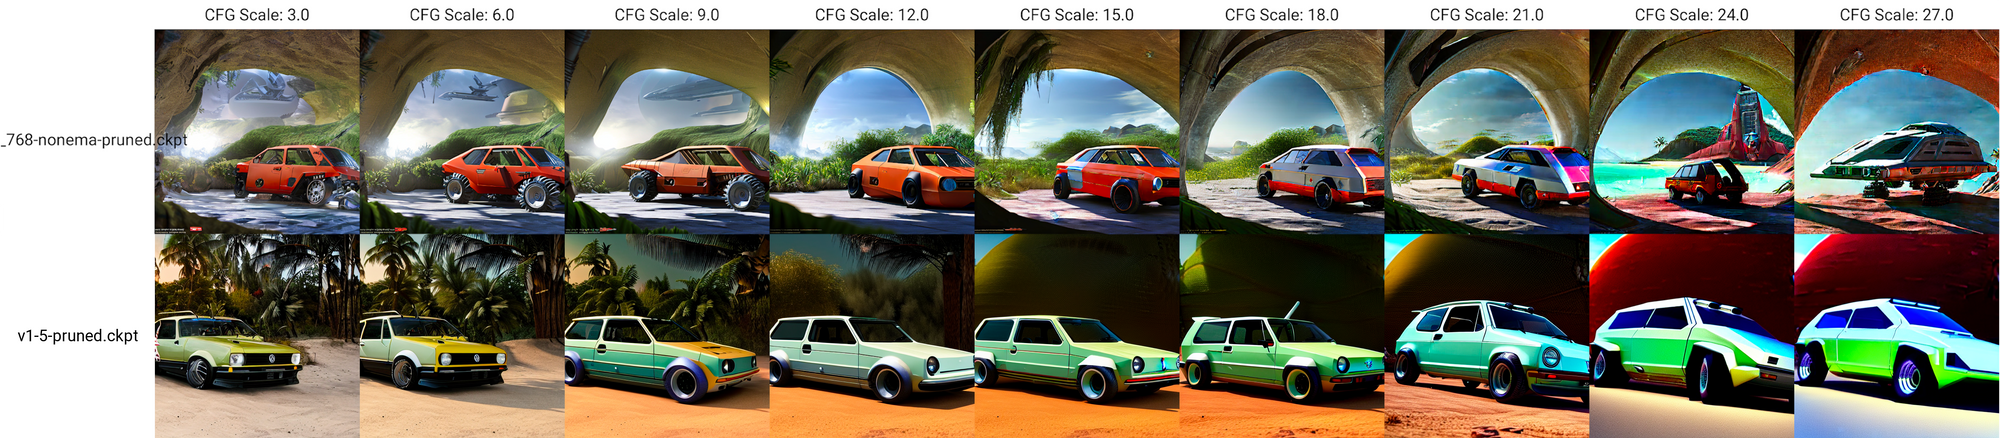
- Prompt S/R
Find in the X/Y script options. S/R stands for Search/Replace. It searches for the first word and replaces it with the words in the list.- Prompt: a picture of a dog
- S/R prompt: a dog, a cat, a wild elephant
- Result: a picture of a dog, a picture of a cat, a picture of a wild elephant
- Prompt Matrix
Combine different (part of) prompts. Type the words you want to integrate at the end of the prompt split with | string0 \ string1\ string2.
Negative prompt: "white borders",
Steps: 30,
Sampler: DPM++ 2M,
CFG scale: 8.5,
Seed: 21391486.0,
Size: 768x768,
Model: v2-1_768-ema-pruned.ckpt.
- Prompt for file or textbox
Generate multiple prompts, each prompt in a new line.
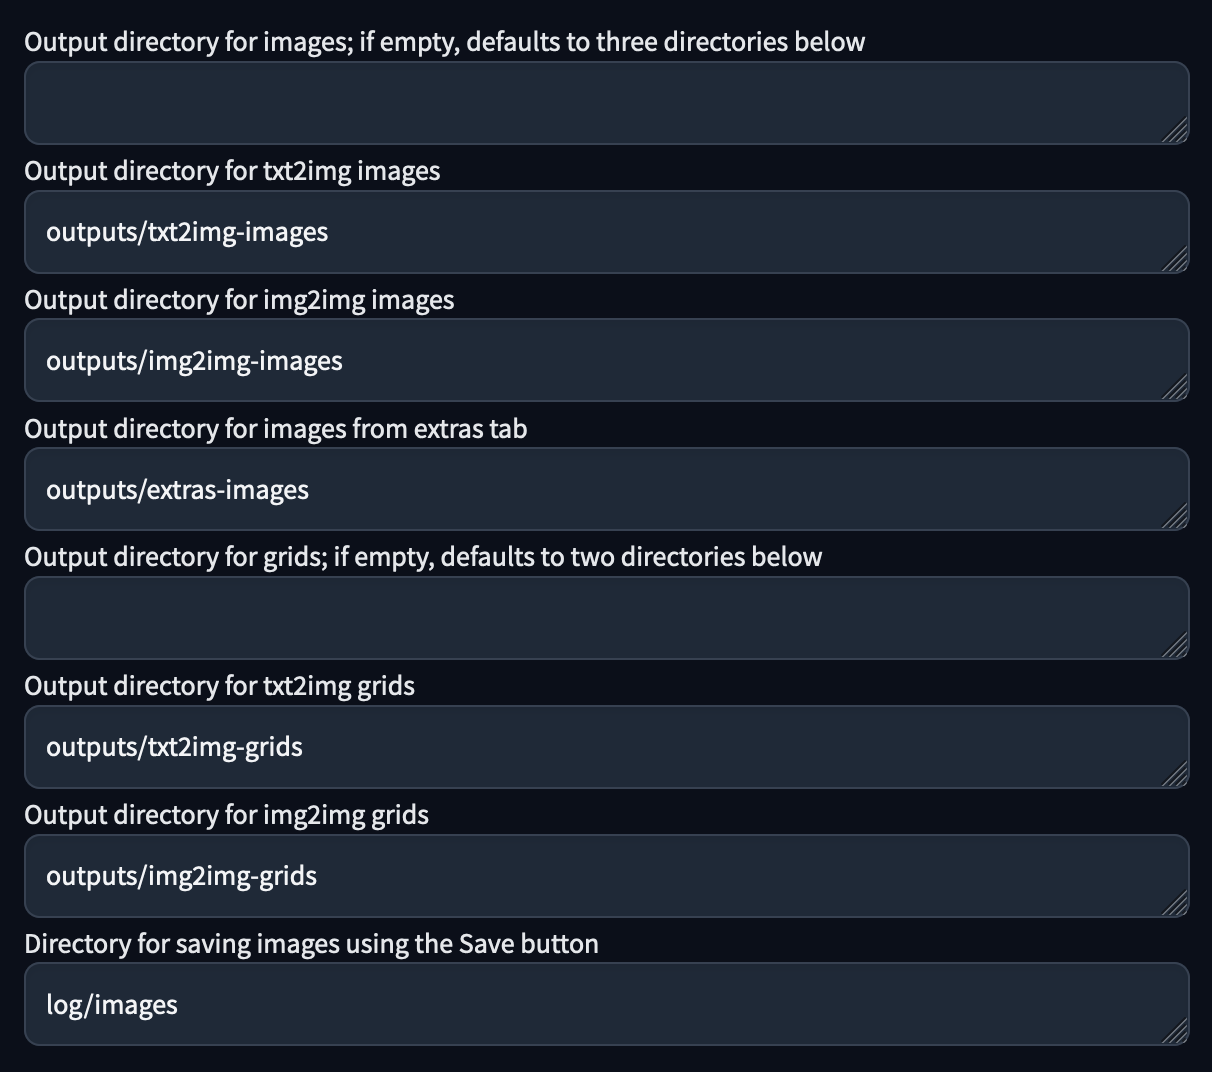
Output
All the outputs are saved in the folder outputs/txt2img-images or txt2img-grids. txt2img-grids lists the images if multiple are generated at once. You can edit the name of the folder(s) in the settings tab under Path for saving.
You have the option to send the output to another tab. Moreover, the metadata is shown under the output after each image generation. This information is also saved as metadata within the output image and can be read by using the meta data reader inside the PNG-info tab.

There are also good extensions to browse through an image history, more on that below.
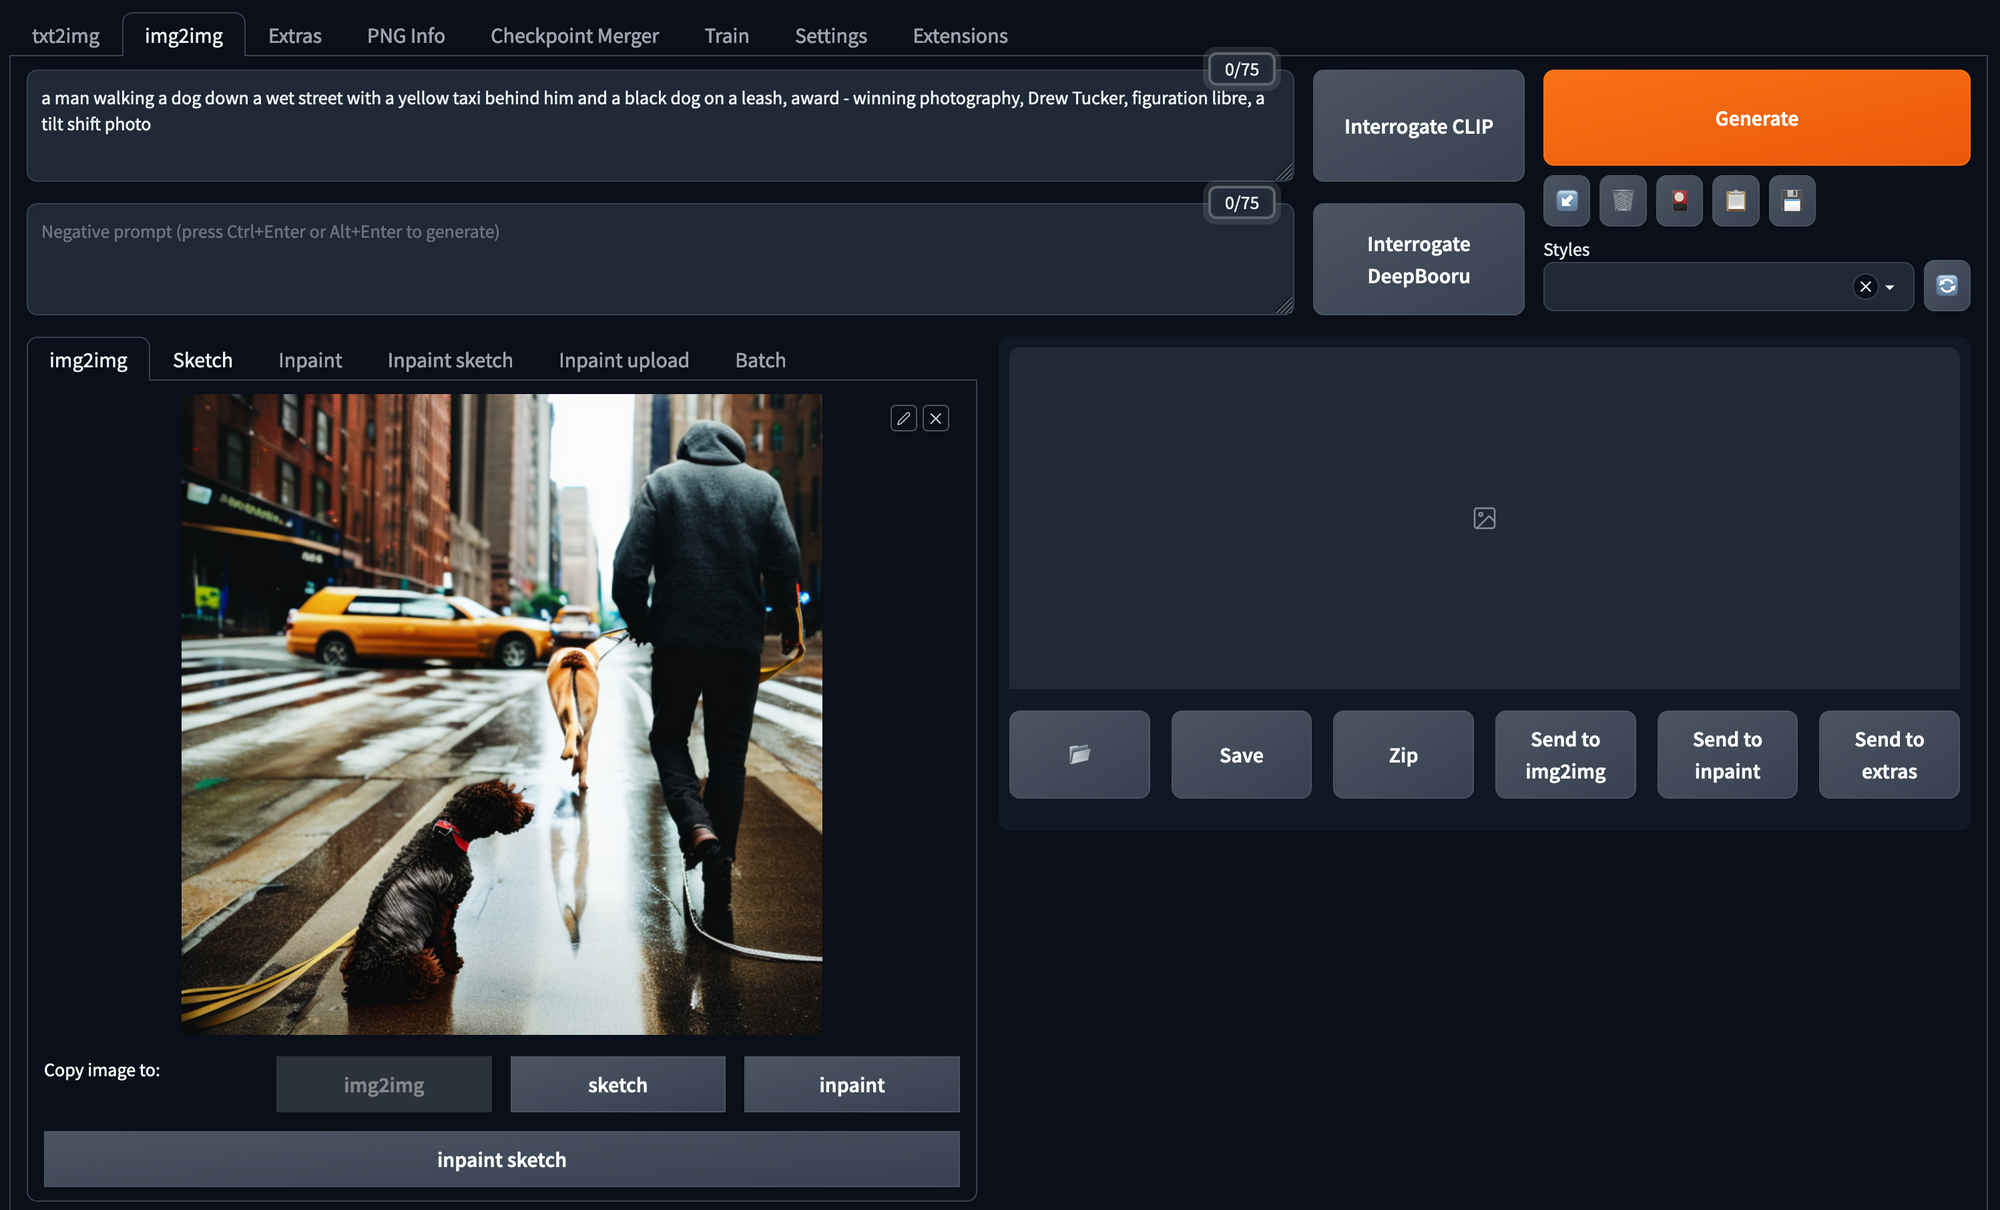
Img2Img
The Img2Img tab allows you to generate images based on both a text prompt and an input image. This offers a wide range of possibilities.
Interrogate
CLIP is the text encoder that transforms the prompt into embeddings. Clicking Interrogate CLIP triggers the reverse way of explaining an image. The CLIP model then interprets the contents of the image and outputs a text description. Note that this will not give the exact prompt that you gave in.
Img2Img
Generate an image from the combination of a prompt and an input image. The prompt should describe the input and aspects to change about the input image. You can do the same parameter tweaking as in the txt2img tab.
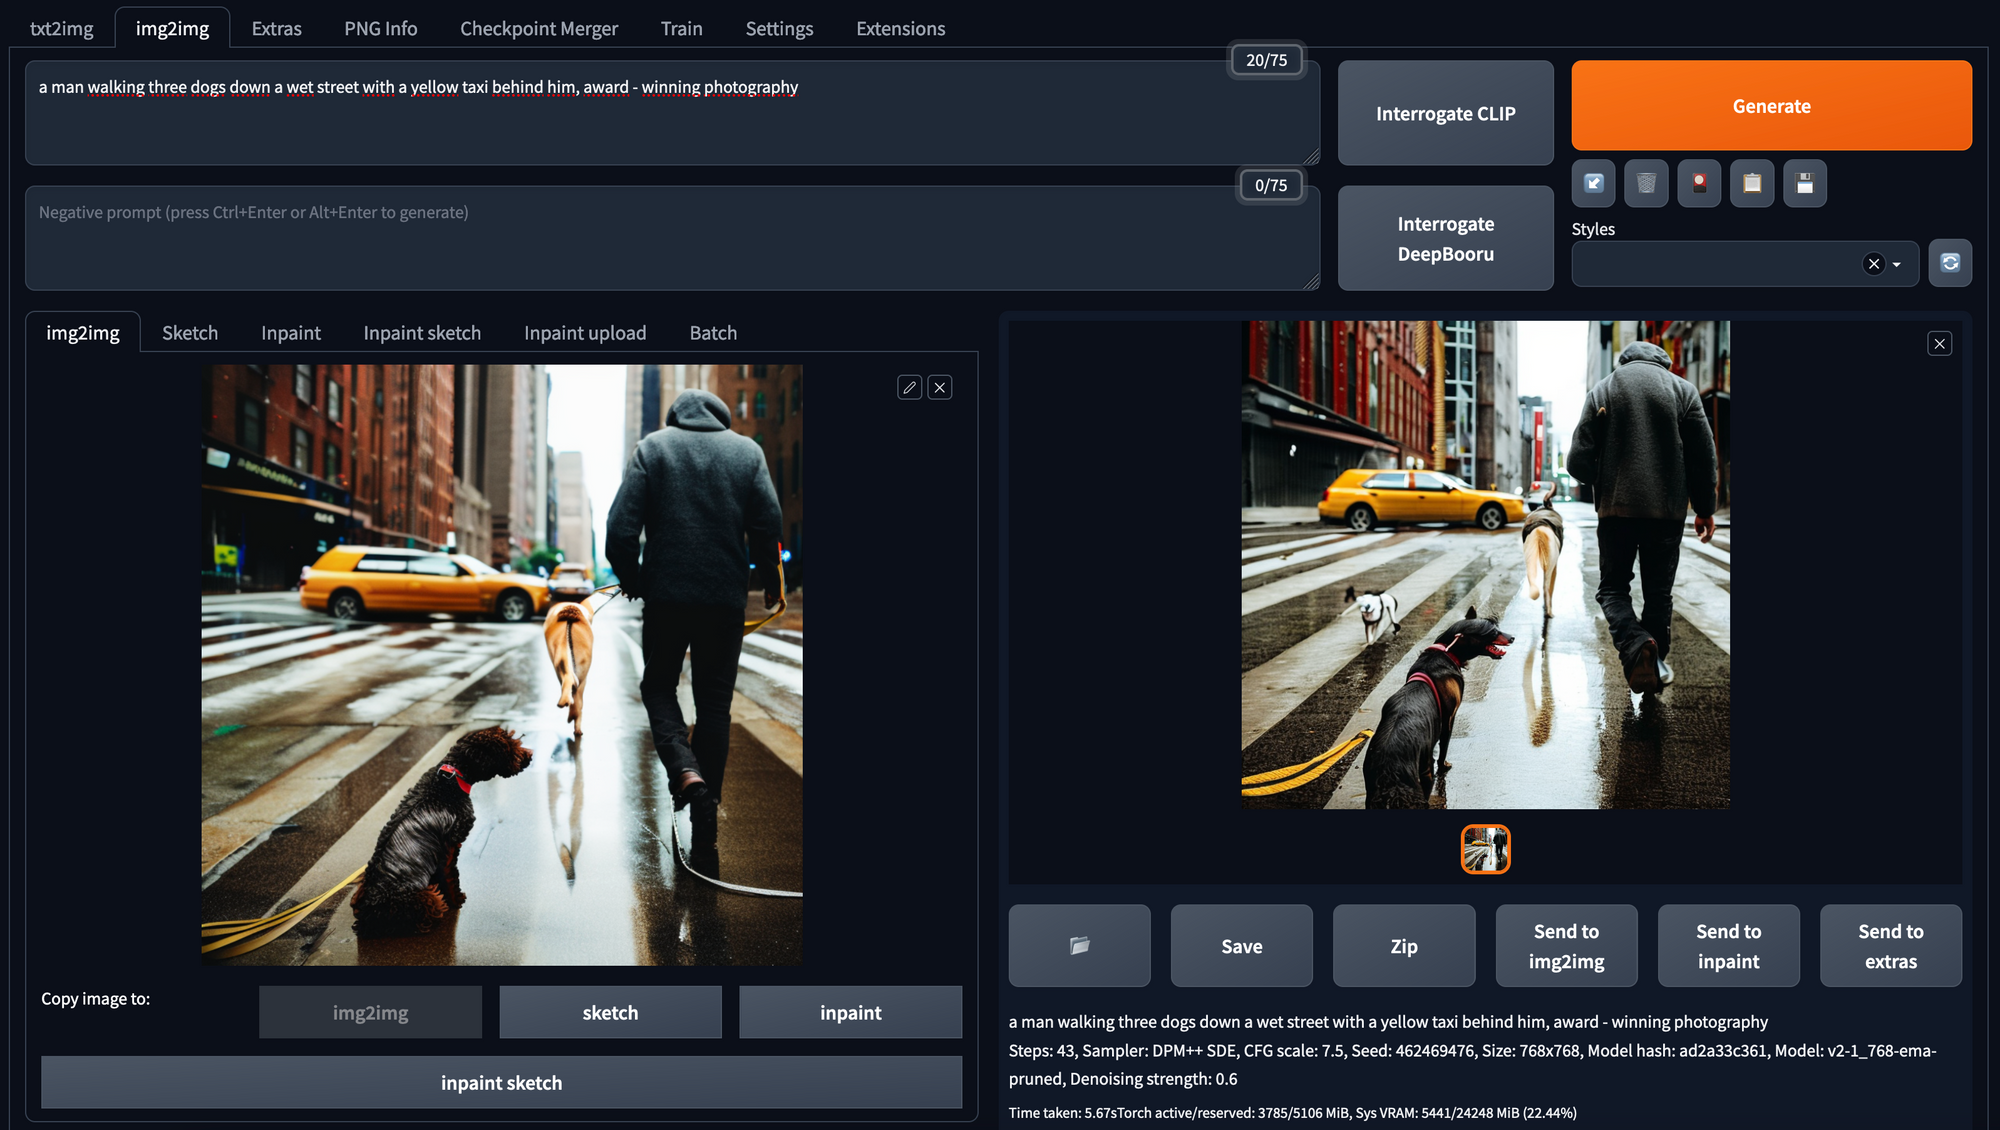
One of the additional parameters is the denoising strength. It is a guidance scale as to how much of the underlying original image is used in the new image. A good start for this parameter is between 0.6 -0.7.

Steps: 20,
Sampler: Euler a,
CFG scale: 11.5,
Seed: 470802332,
Size: 768x768,
Model: v2-1_768-ema-pruned.ckpt.
A few more application examples of img2img are:
- Turn a sketch into beautiful art. Another cool option is to create a sketch with the color sketch tool, add --gradio-img2img-tool color sketch in the command line arguments.
- Restore faces, you can also activate the restore faces option.
- Create variations of a generated image or get similar images. Note to use the same prompt if you want similar images or change small aspects of the prompt. This is a useful tool for fine-tuning.
Steps: 29
Sampler: DPM++ 2M
CFG scale: 10
Seed: 103025262
Denoising strength: 0.66
Conditional mask weight: 1.0
- img2img alternative test
Change small aspects of a picture of a face. Select this option in scripts. This video and instructions link provides more information about the exact steps to follow.
Inpainting
To inpaint an image, you would first need to draw or upload a mask to define the area you want to inpaint. The prompt would then be used to generate the content that should be placed in this region. Remember to change the model to an inpainting model. Several parameters can be adjusted to control the inpainting process.
- Mask blur
- Masked content options: decides what is placed in the masked region before the prompt is applied
- Original content: start with this.
- Fill: erase the content of masks and regenerate
- Latent noise: start from static noise
- Latent nothing: start from nothing
- At full resolution: zoom into the masked area during the generation process. Enable this.
- Denoising: experiment with this to improve the quality of the generated image.
- To use different colours for the mask, enable
--gradio-inpaint-tool color-sketchin command line arguments, also see this section for more info.
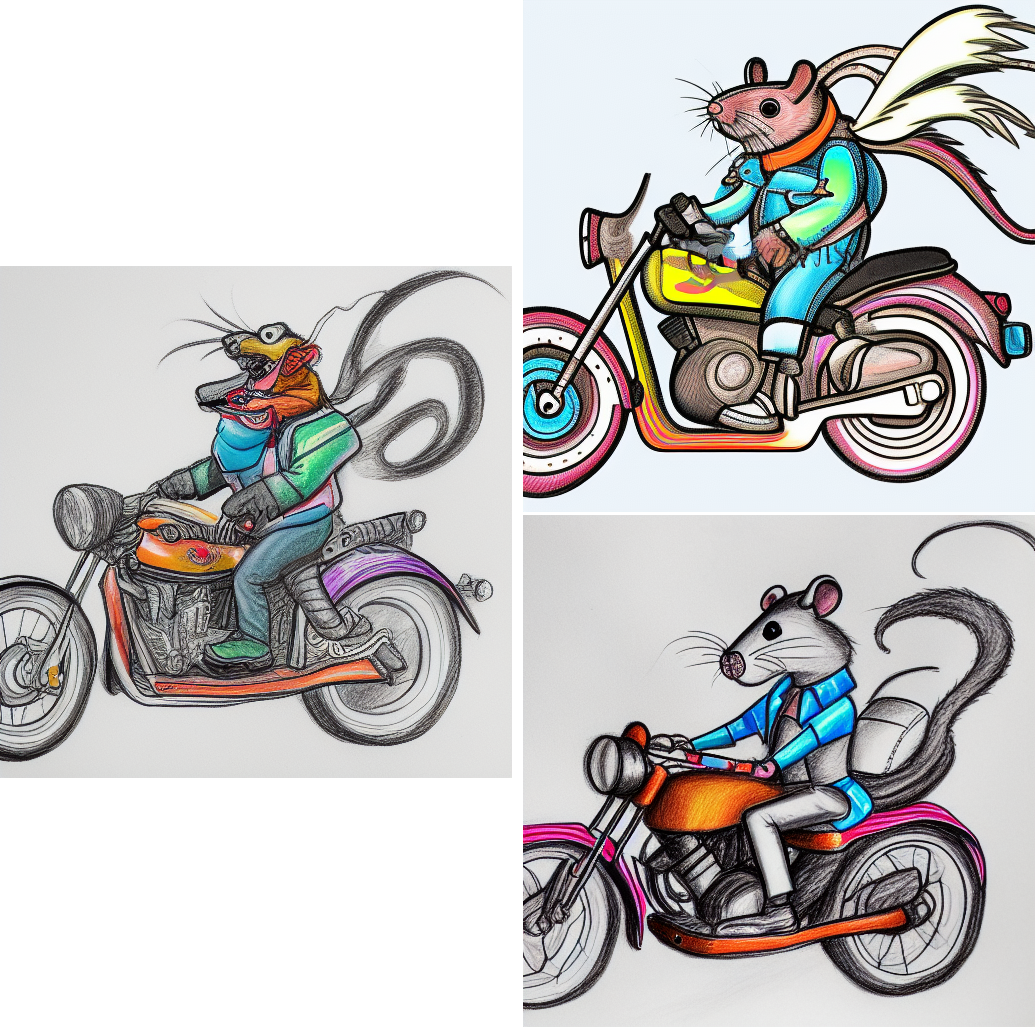
A good application example of inpainting is just changing small parts of an image, like the eyes or the mouth of a face: Only cover the part you want to change (like the head in the riding rat example below), set the denoising strength to 0.5. For human faces enable the restore faces option. Use the same prompt as the original image and create different examples.
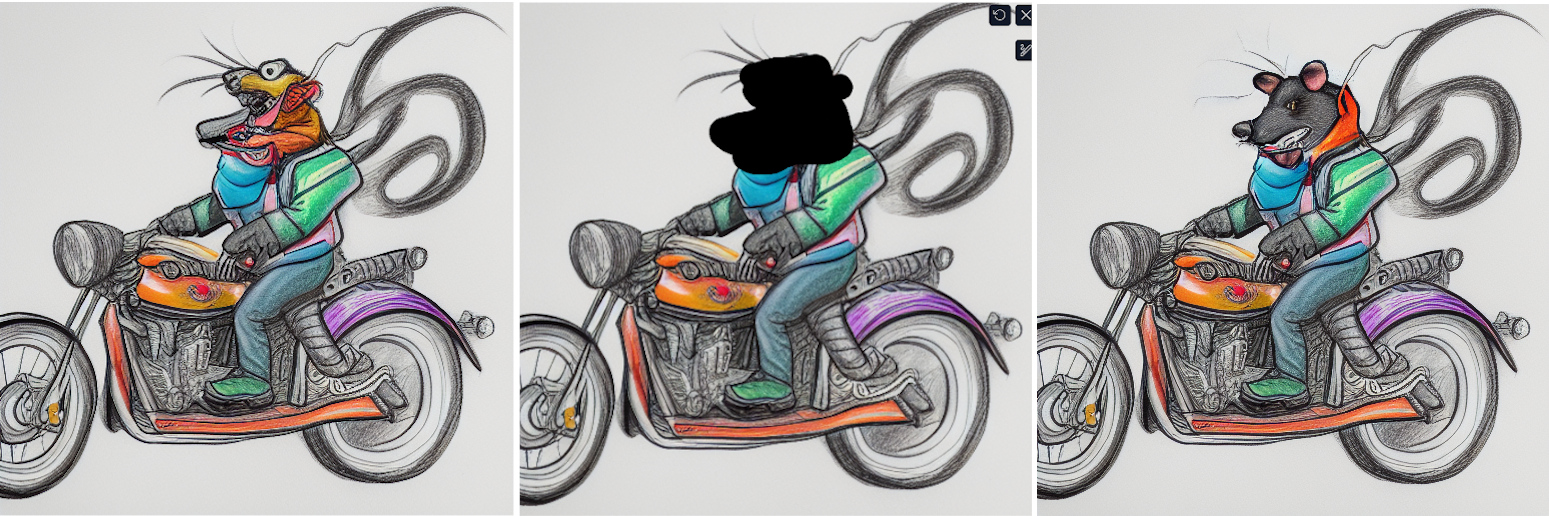
Prompt: "a drawing of a smiling rat, vivid colors"
Steps: 29,
Sampler: DPM++ 2M,
CFG scale: 10,
Seed: 103025262,
Size: 512x512,
Model: 512-inpainting-ema.ckpt,
Denoising strength: 0.66,
Conditional mask weight: 1.0,
Mask blur: 4
Extras
Upscaling
If you want to enlarge the resolution of the images from the standard trained resolutions such as 512x512, you can use the ESPRGAN_4X upscaler in the Extras tab. This allows you to enhance the resolution without losing too much detail.
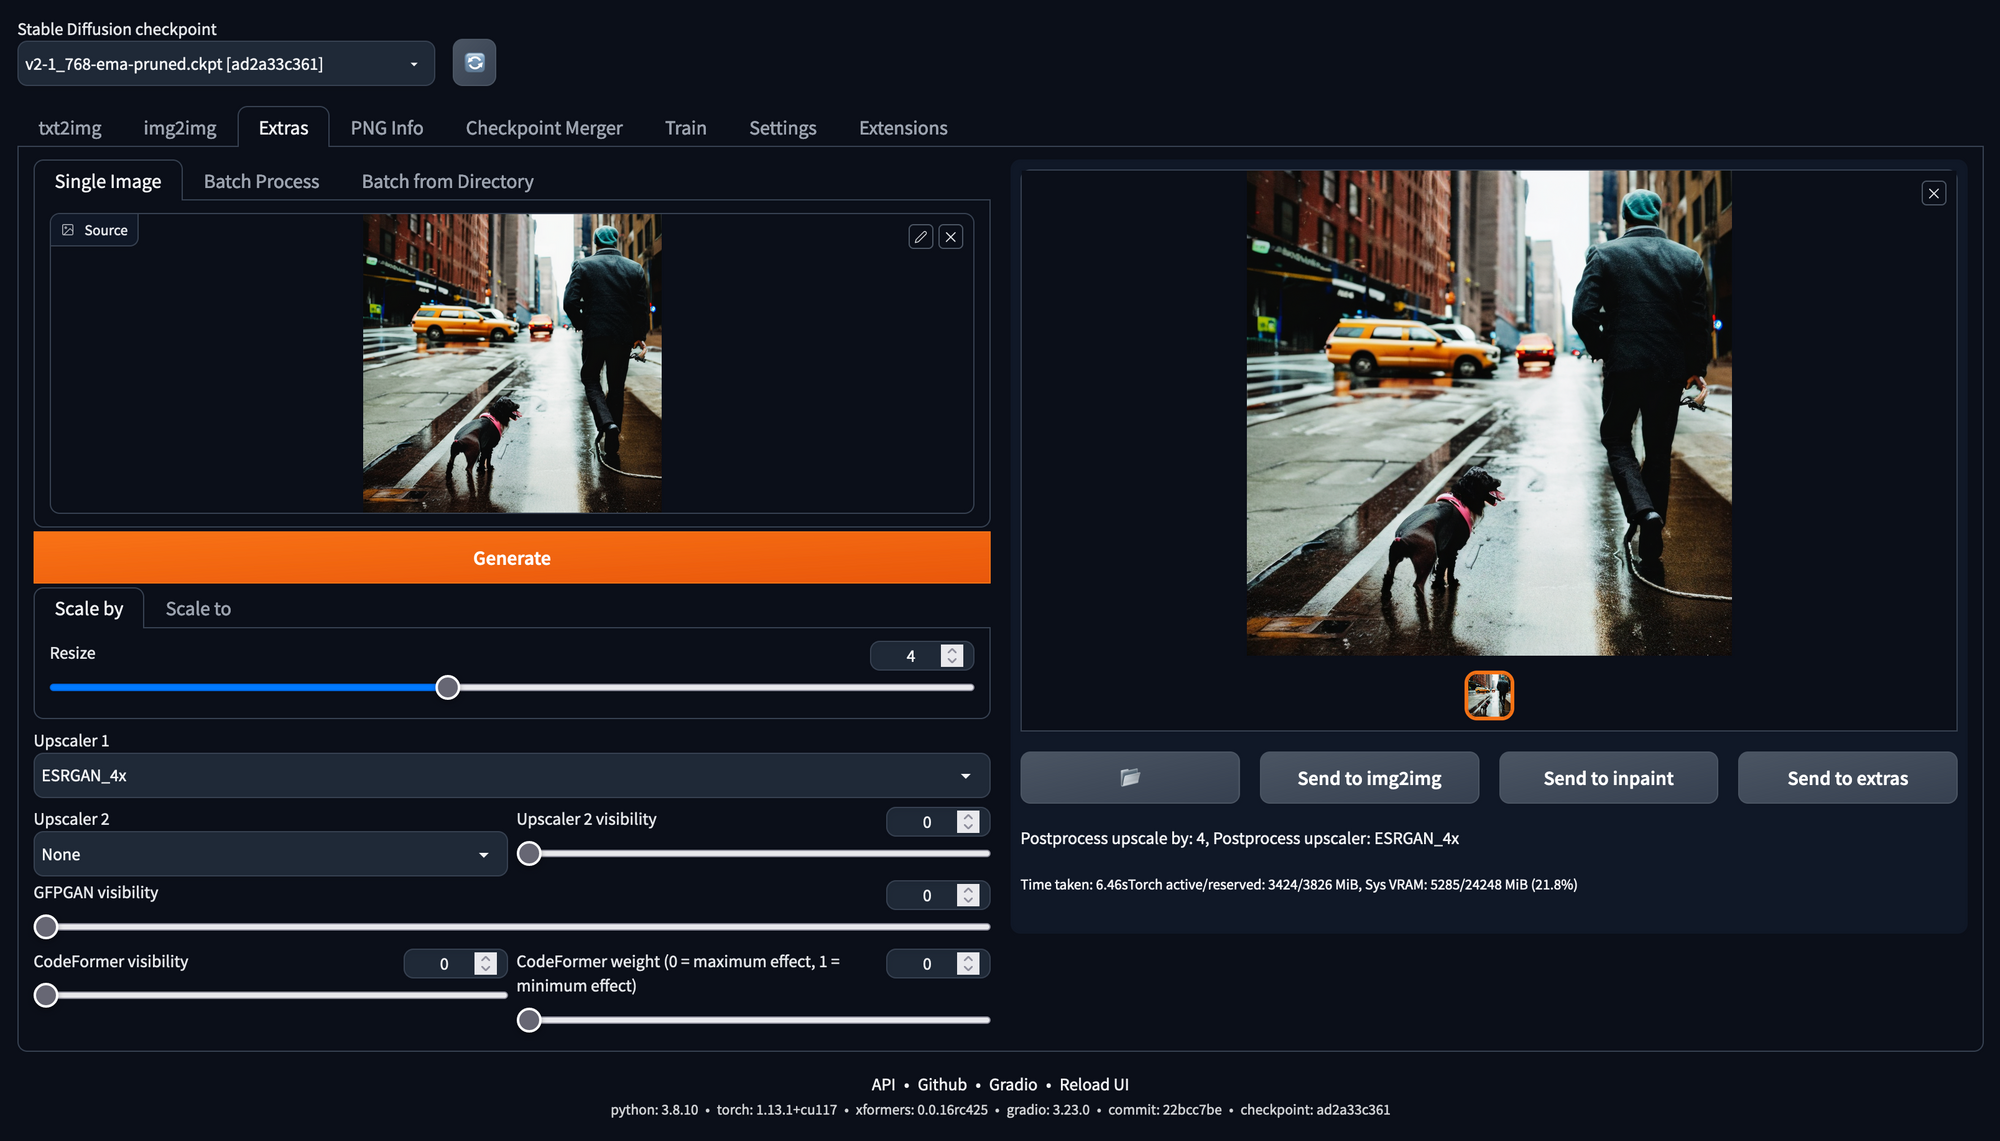
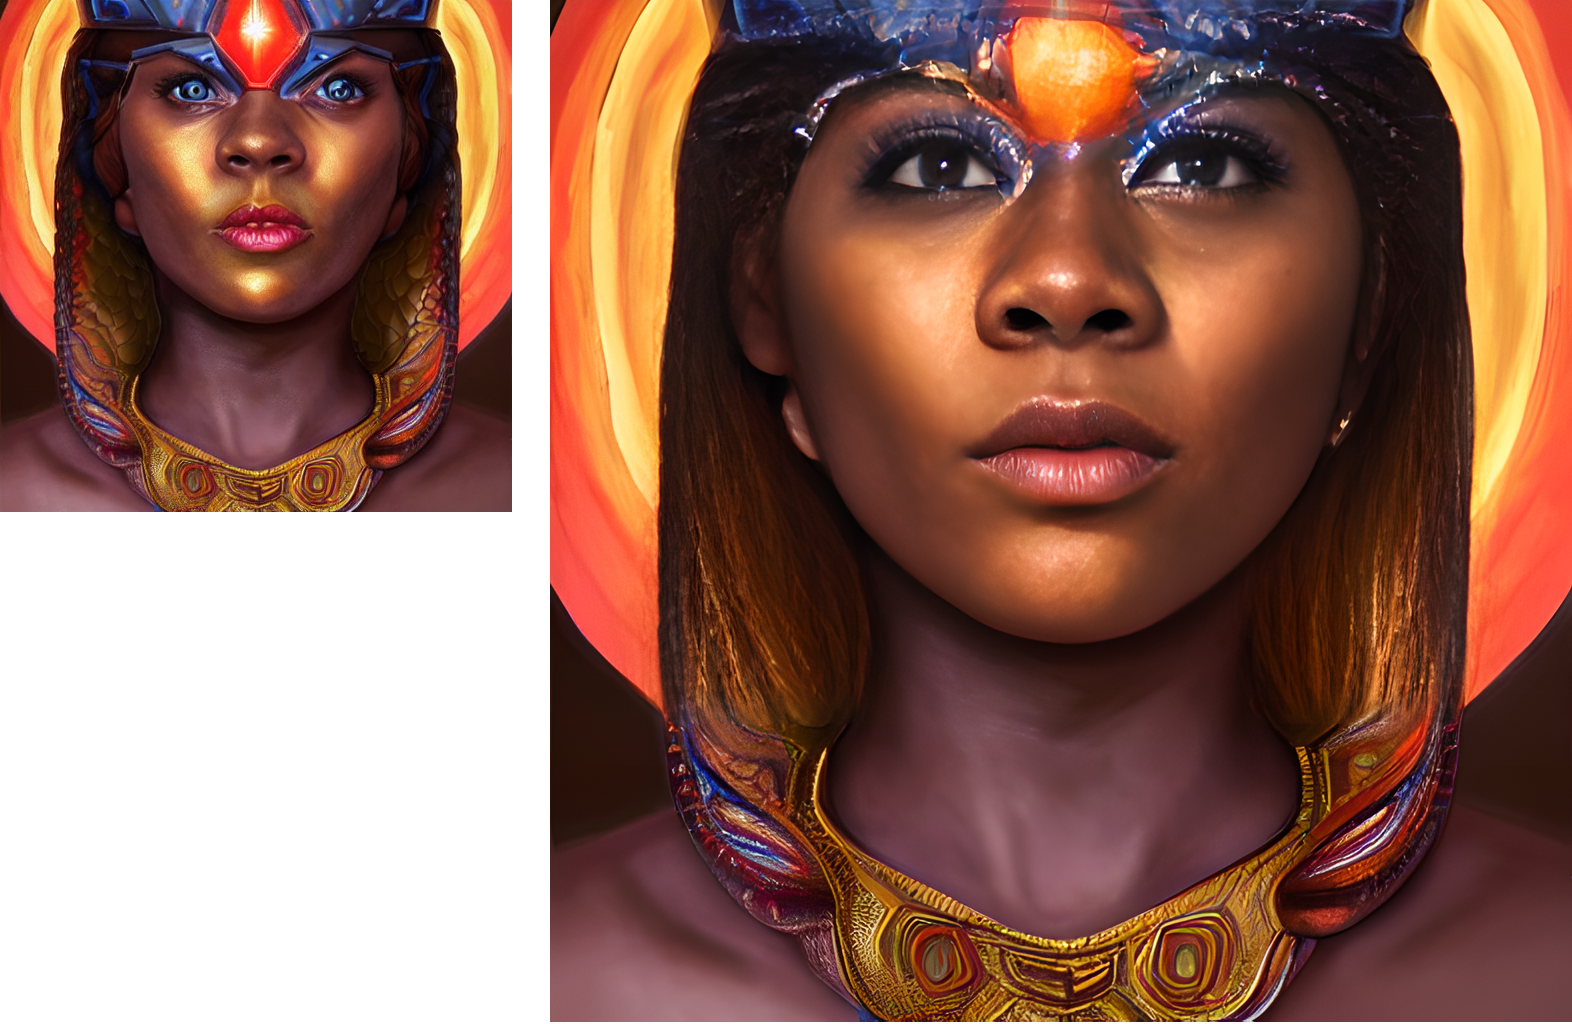
In addition to upscaling, the GFPGAN and CodeFormer tools restore distorted or damaged faces in images. These can be used separately or together. A good start is to put the visibility slider to 1. If you want a quick fix, use the Restore Faces and HighRes options in the Txt2Img tab. As seen in the example image, these tools can improve symmetry and fix any issues with the eyes. But this also creates a smoother effect and sometimes loses a bit of detail.
You can also do this with more pictures, select a directory in the Batch Process sub-tab or Batch from Directory sub-tab.
Steps: 20
Sampler: DPM++ 2M
CFG scale: 6
Seed: 3876469716
Model: v2-1_512-ema-pruned
PNG info
All the images created with the WebUI are saved with metadata. This includes information about all parameters used for generating the image, the prompt, sampler, seed, etc. You saw a screenshot of this tab above (see Output).
Another easy way to keep track of the metadata is to edit the filename in settings.
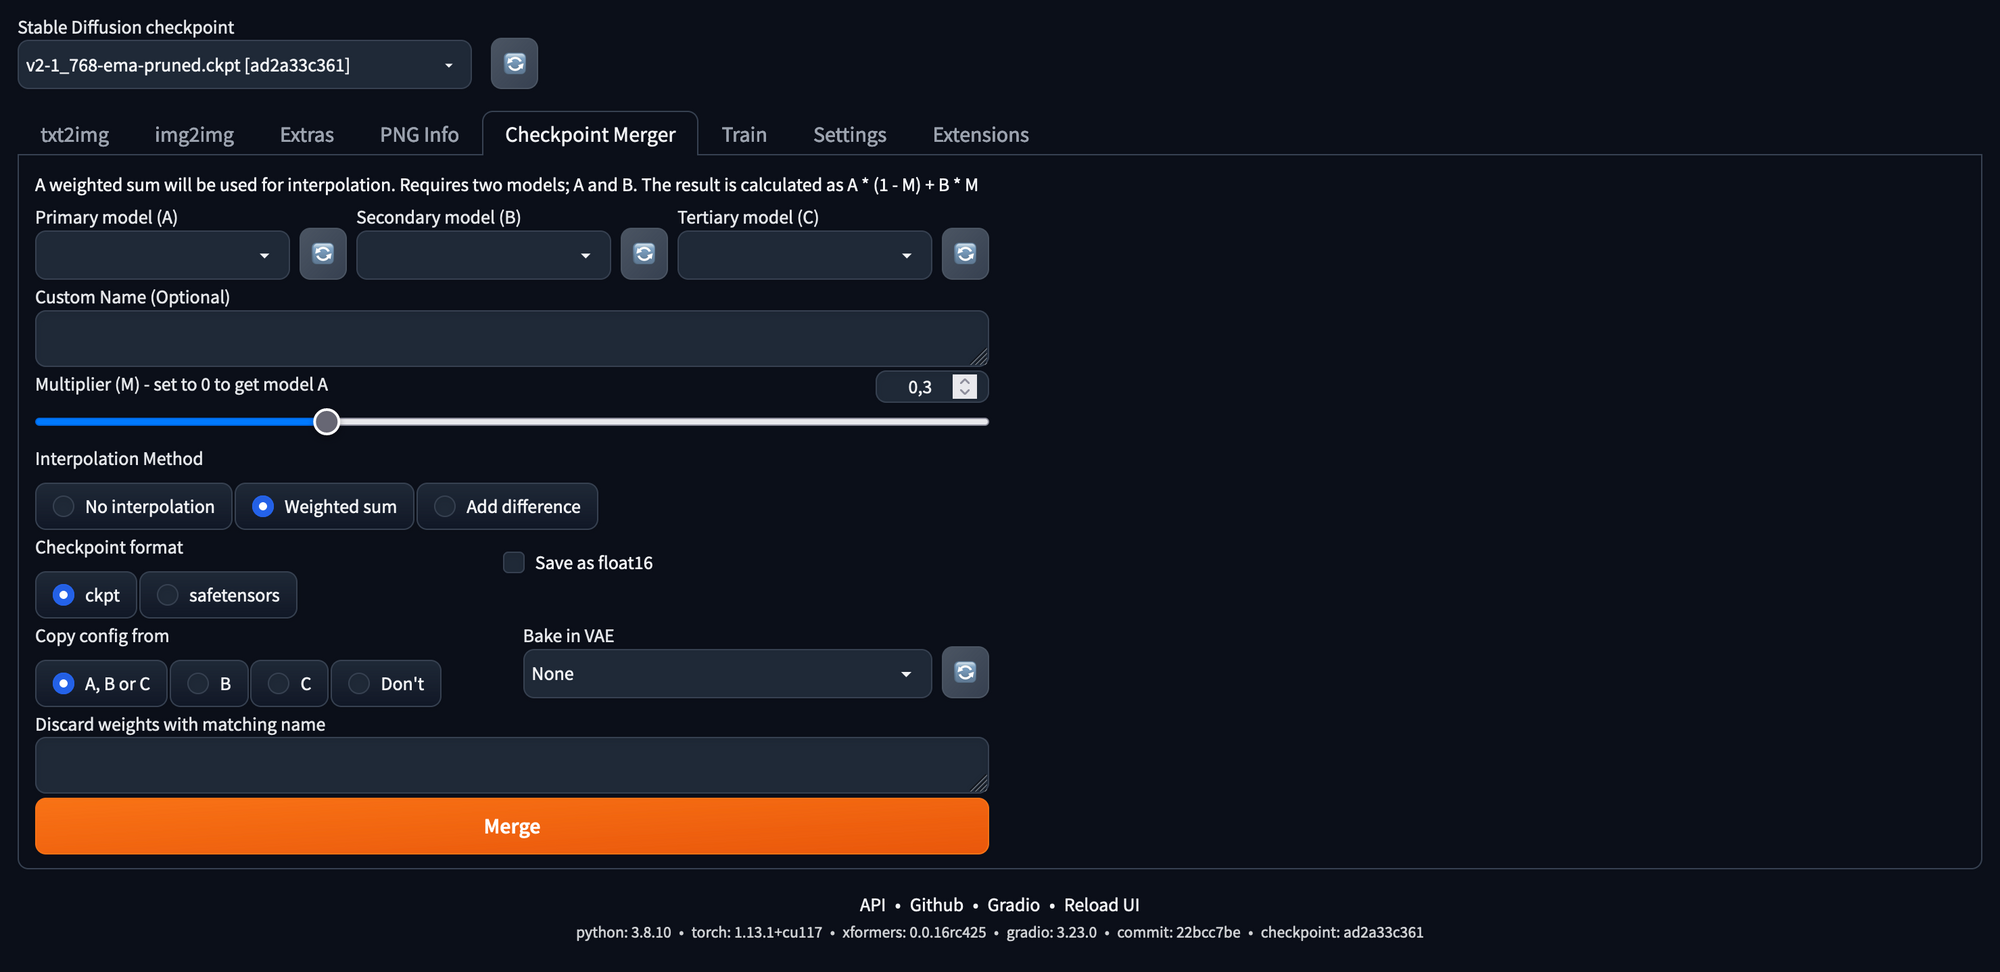
Checkpoint Merging
If you want to merge different checkpoints for combining fine-tuned models, this is your tab. We will provide more information about this in a later blog article. You will find a quick introduction in the wiki.
Training
Textual inversion is automatically included in webUI. This is a way to personalize the model with your own training images and it works way better with the v2 models than before with v1. In short, Textual Inversion creates embeddings that resemble the training data. If you are interested in a longer explanation, please read on here. You can see these embeddings as keywords that internally expand to a very precise prompt. How to implement this in a couple of different ways will be covered in a future blog article.

A quicker way instead of training your own embeddings is to use pre-made embeddings. For example, this embedding will create a style of the Midjourney model. Just download and put it in the embeddings folder and restart the webUI. To use it type the keywords art by midjourney (reddit-link). It is possible to use multiple embeddings to combine styles.
Extensions
Custom features can be added to the webUI via extensions. You can explore all the extensions in the Extensions tab. Go to Available and press the Load from button. Install your favourite extensions and press on the URL of the extension's github repo for more information.
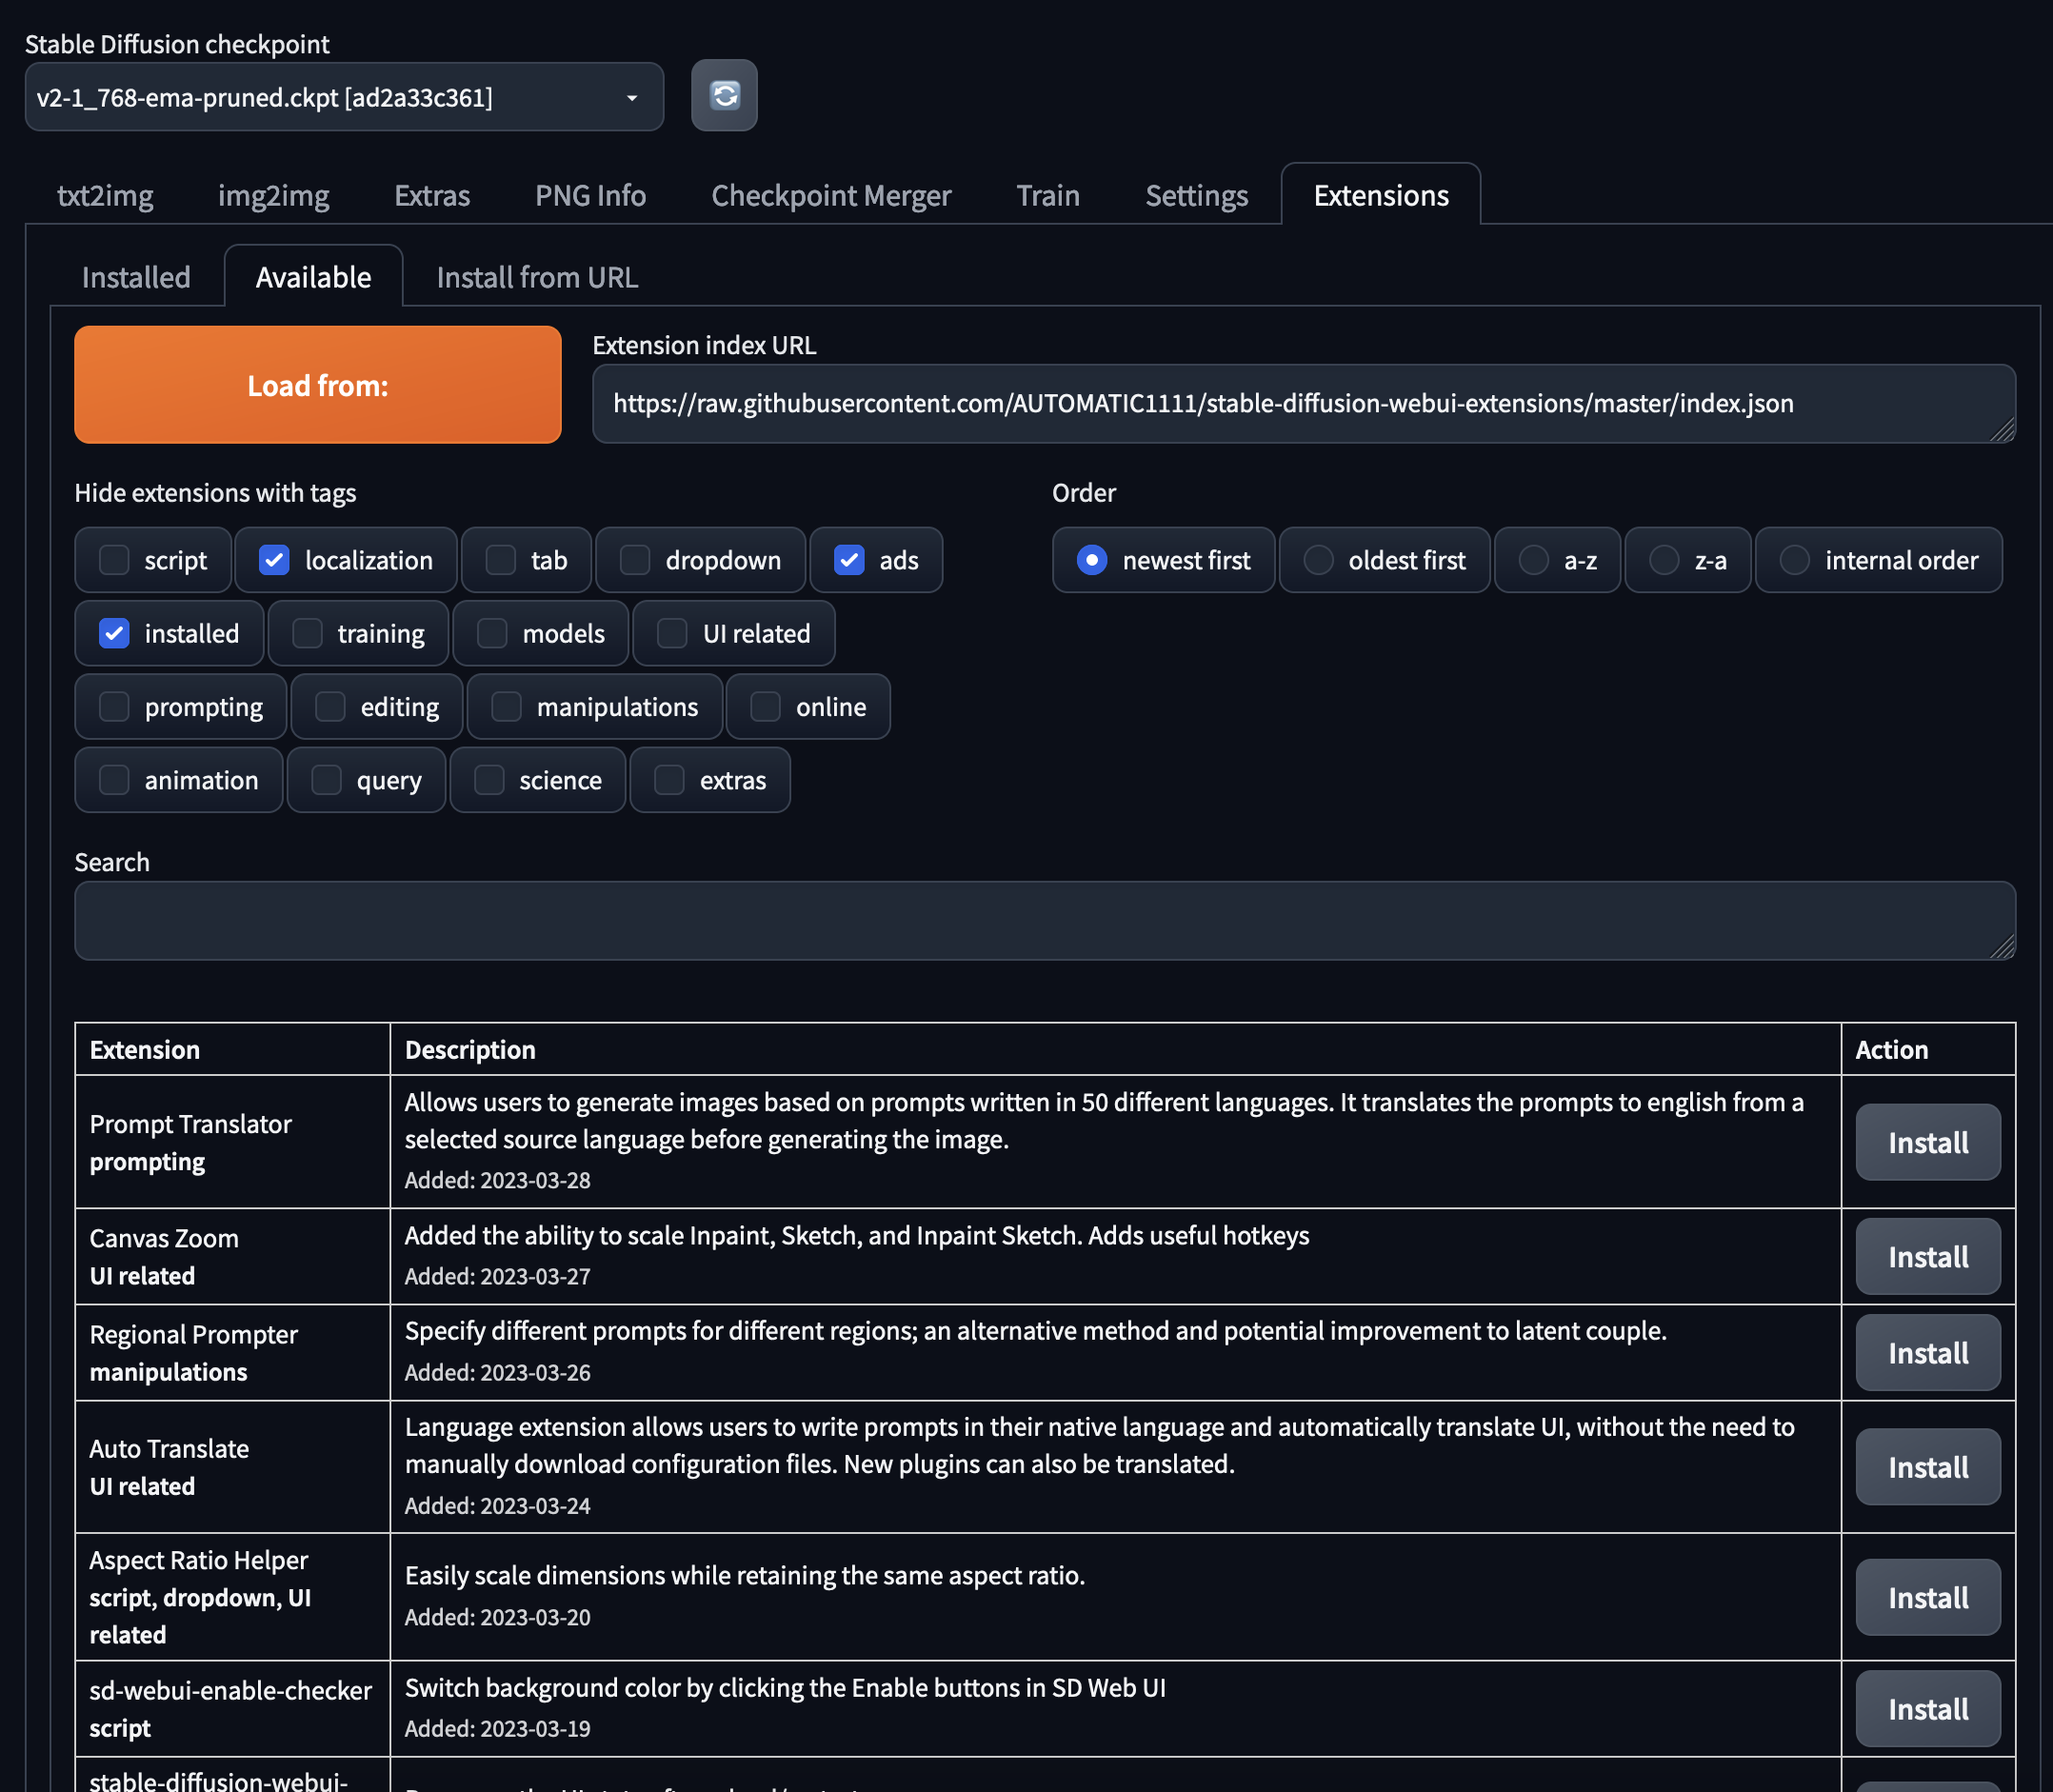
Another way is to download or clone the extension's repository into the extensions folder within AUTOMATIC1111's stable-diffusion-webui repository. This link provides an overview of the most used extensions. Here are also a few recommended extensions:
- Image Browser: Allows users to see the history of all generated images. This makes it easier to find old outputs and metadata without having to search through the file explorer.
- Depth Map: Creates a depth map of the image to enhance the img2img process. Allows the users to control an extra depth dimension of the image. Use this in scripts in the img2img tab.
- Auto-sd-paint: A more sophisticated tool for sketching with the Kreta plugin. Instructions for usage and information about this fantastic tool are found in the Wiki tab of this extension.
- Dreambooth: Another way to personalise or fine-tune the models. This topic will be covered in more detail in a future blog post.
- Deforum: Create .gifs or video output for 2D and 3D animations.
- Outpainting: Outpaint an image on an infinite canvas.
Command Line Arguments
The command line arguments add extra features or customize the webUI's launch depending on your needs or system requirements. This relevant page gives more information about all the arguments. You can edit the webui-user.sh file to set standard command line arguments. Uncomment COMMANDLINE_ARGS=.
Here are a few useful arguments:
- --xformers
Enables the xformers library, which can speed up image generation and reduce GPU memory requirements. However, this can sometimes lead to inconsistent results, especially at lower steps. - --gradio-img2img-tool color sketch
Adds an editior for masking or sketching in the img2img tab. This feature works best in a Chrome browser, as it can be a bit laggy in Firefox. Another more sophisticated option for img2img and also inpainting is the auto-sd-paint extension with the Kreta plugin. - --gradio-inpaint-tool color sketch
Allows users to create a colored mask for inpainting, which can improve the consistency of the results. - --device-id
Select and specific GPU for running the program. Sometimes you need to execute the command export CUDA_VISIBLE_DEVICES=num_gpu before.
Tips & Tricks
multi GPU
The only way you could use multiple GPUs is by running multiple instances. First export CUDA_VISIBLE_DEVICES= num_gpu, then launch different webUIs with the argument --device-id num_gpu. It is important to type this argument as the last argument. If you want to launch different webUI's simultaneously, also set the --port argument to something other than the standard 7860, otherwise you could be on the same GPU or weblink.
For example with two GPUs you best go with using the linux tool screen to be able to stay within the same MLC.
# screen session I
# this will open the webUI on the standard GPU and port (7860)

[webui-automatic1111] user@hostname:/workspace$
bash webui.sh --xformers
# screen session II
# this will open the webUI on the second GPU using port 7861

[webui-automatic1111] user@hostname:/workspace$
export CUDA_VISIBLE_DEVICES=1
bash webui.sh --xformers --port 7861 --device-id 0
Run with Accelerate
Running the webUI with Accelerate improves efficiency and memory consumption of inference and training. Open the webui-user.sh file and uncomment export ACCELERATE="True". You may need to restart the app once or twice.
Updating
It is important to update the webUI regularly to ensure that you are working with the latest version. To do this first check if there are any updates and then pull the new changes:
[webui-automatic1111] user@hostname:/workspace$
git status
git pull
Updating the extensions can be done in the webUI itself. Go to the extensions tab, check for updates, apply and restart webUI. You probably have to reload the page a couple of times.
Useful links
- AUTOMATIC1111 webUI
- Prompt books
- Search engines for image generation recommended for inspiration
- Depth aware masking in img2img
- Explanation of Inpainting and Outpainting
- Other webUI's:
- InvokeAI: a cleaner-looking webUI with convenient and robust features but way fewer features. Because it is not open source, InvokeUI isn't updated as frequently as AUTOMATIC1111, but the updates are less buggy. The installation requires 20GB of free space without the model checkpoints.
- The Last Ben
Conclusion
It's a wrap-up! We've shown that the AUTOMATIC1111 webUI is a user-friendly tool for interacting with Stable Diffusion. It's easy to set up in an AIME MLC and offers a wide range of features and benefits over other possibilities. The key aspects of the webUI were explained and the differences between the Stable Diffusion versions were shown in examples. A few tips and tricks were given to get the most out of Stable Diffusion on your AIME workstation or server. Overall the AUTOMATIC1111 webUI is a valuable resource for those looking to experiment with image generation.
If you have any questions or suggestions, please send us an email to hello@aime info.